Azure CSPM
This guide provides step-by-step instructions on how to set up a Reader Role, create a Read-Only user/application, generate secret keys, and assign read-only permissions to enable TraQez Security Scanner to perform security checks, misconfiguration detection, compliance checks, asset inventory discovery, and resource discovery.
Creating new App Registration
- Login into your Azure Account.
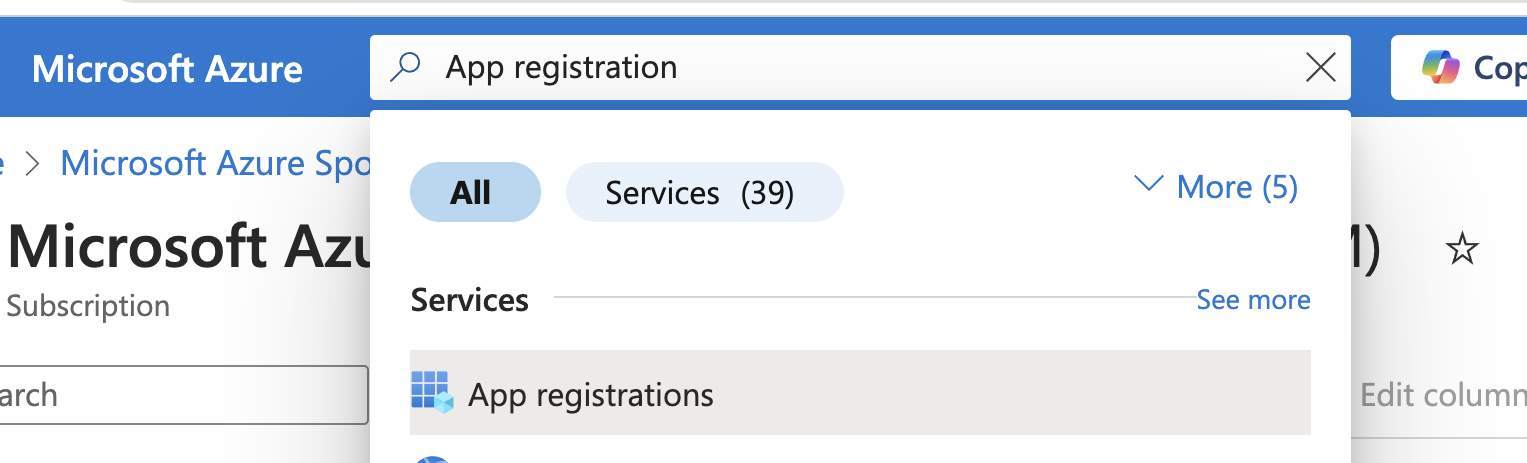
- Type
App registrationin the search bar. SelectApp registrationfrom the search results menu.
To view a reference image of app registrations, click here to expand.
- Click the
New registrationbutton within the App registrations section. - Name the application as
traqez@cloudscan-1.
To view a reference image of registration of application, click here to expand.
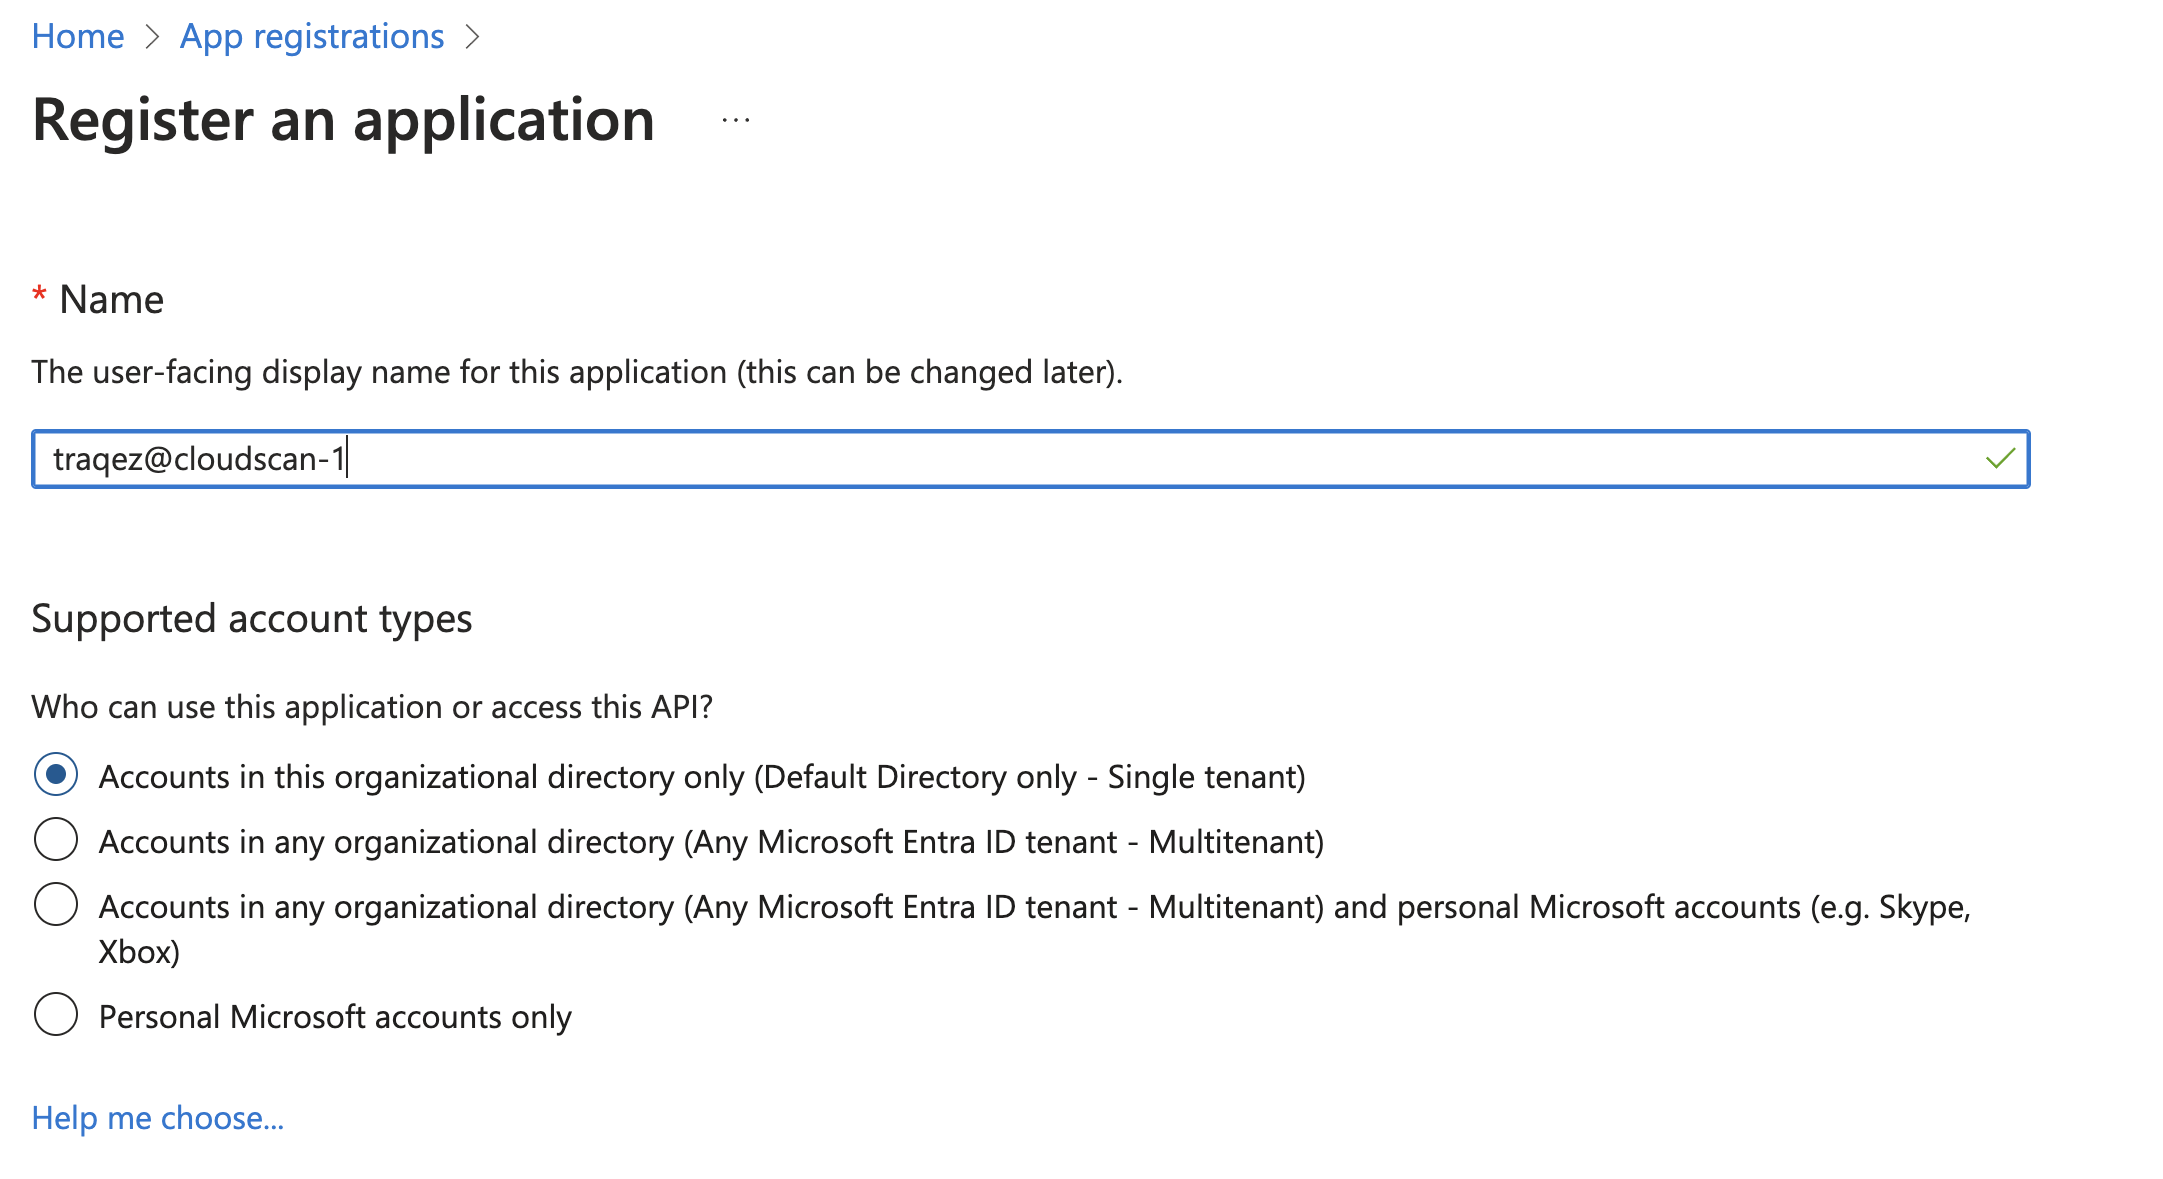
- Select the radio button for
Accounts in this organizational directory only (Default Directory only - Single tenant)and then click theRegisterbutton. - You will be redirected to the newly registered application page for
traqez@cloudscan-1. - Navigate to the
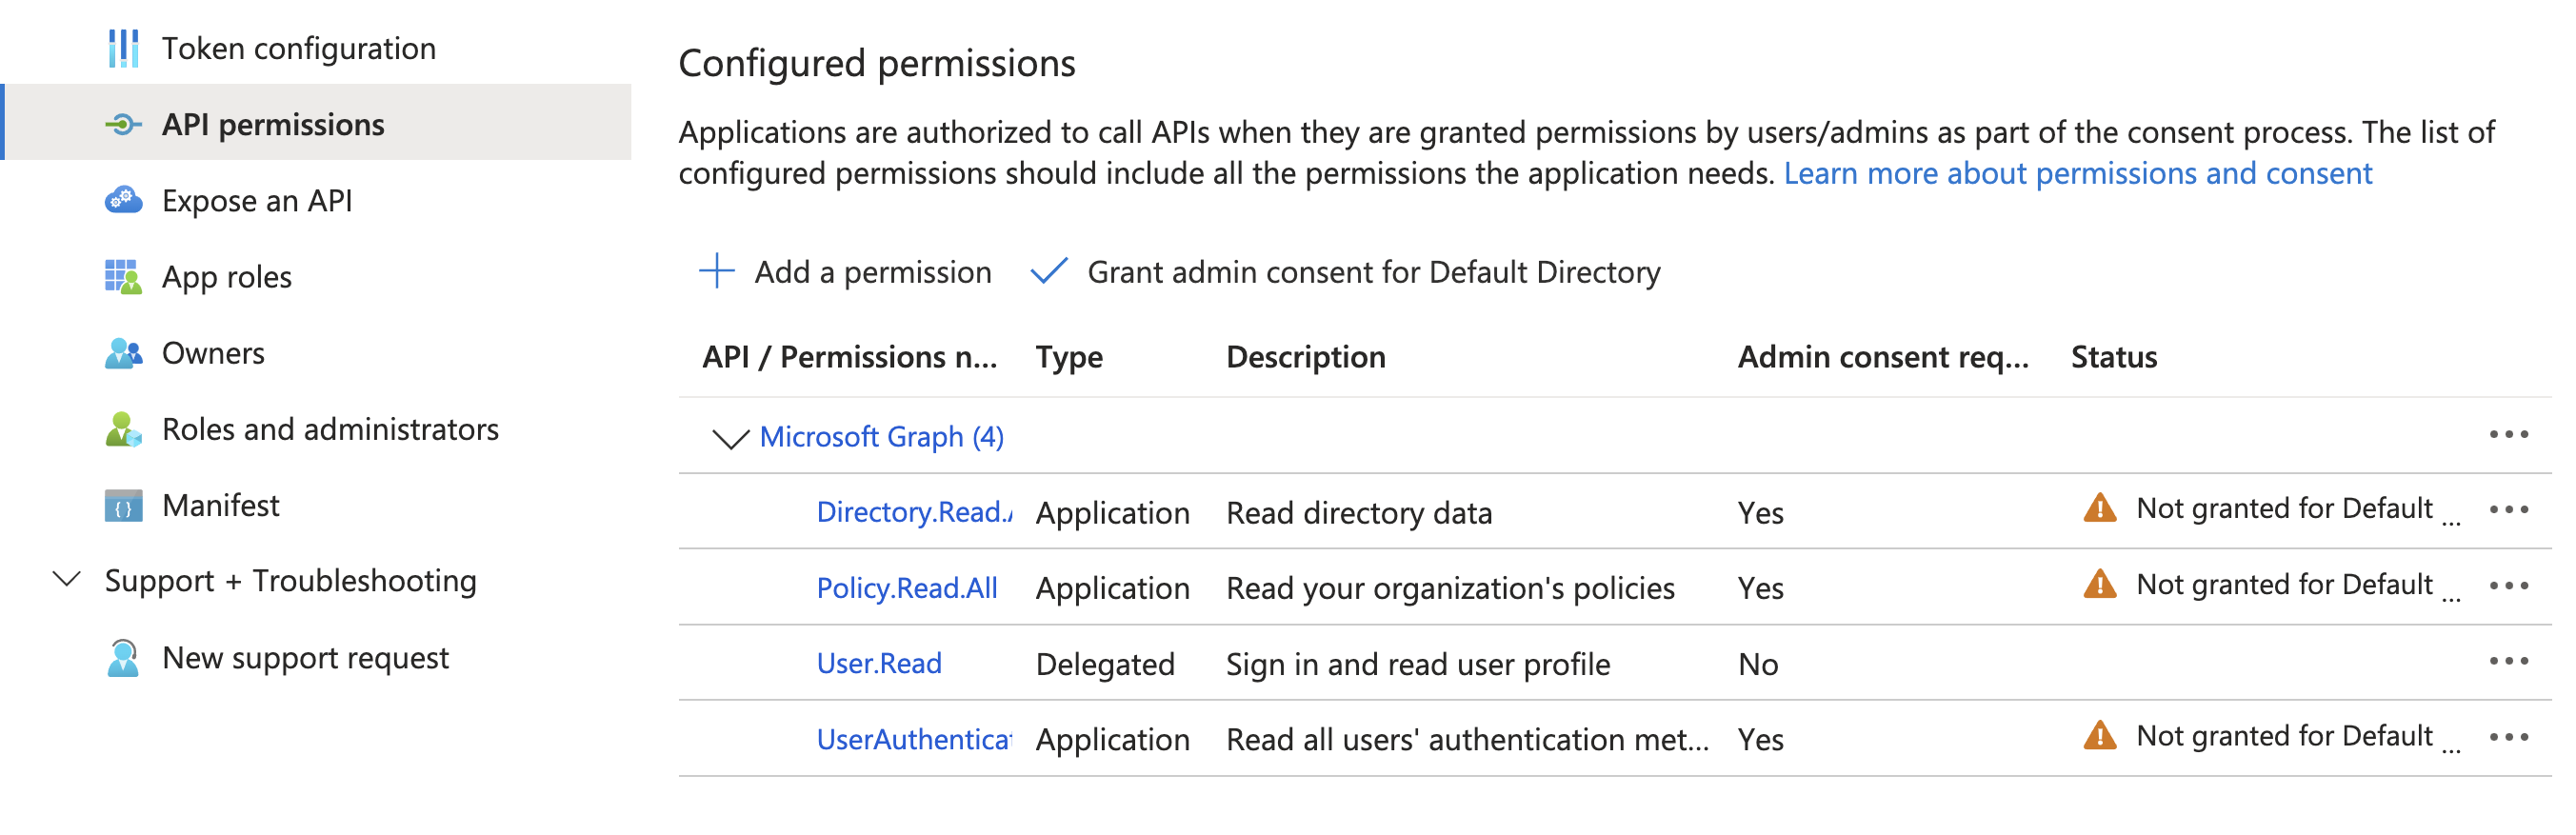
Managesection and selectAPI permissions. Assign below permissions:- Directory.Read.All
- Policy.Read.All
- UserAuthenticationMethod.Read.All
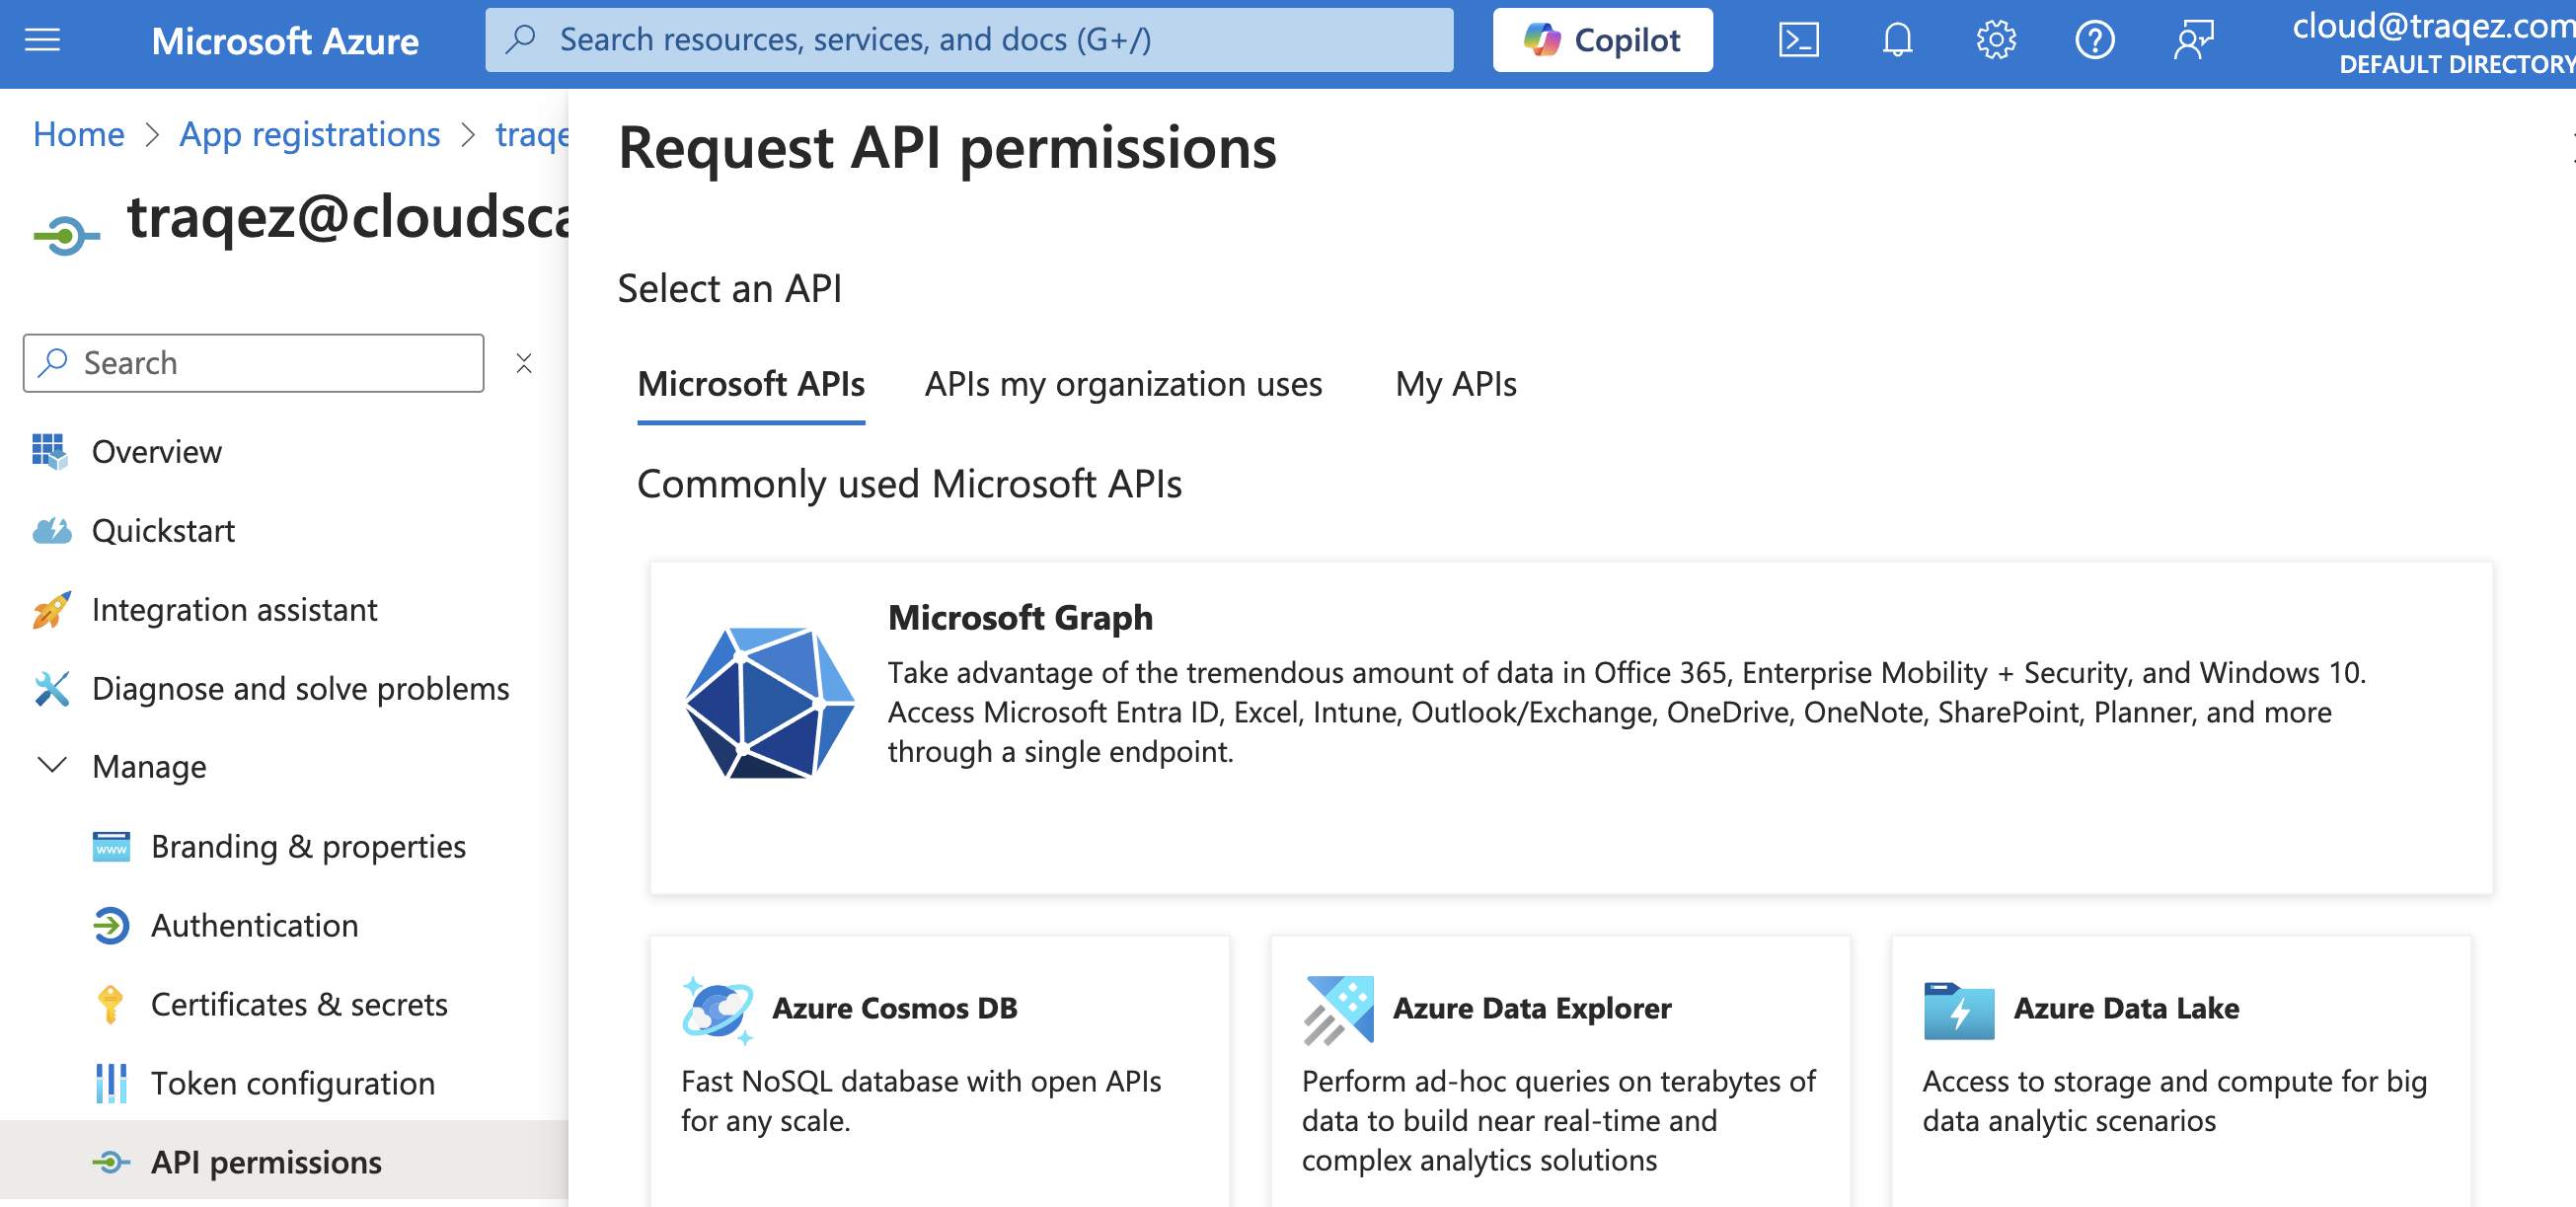
- To add a permission, follow these steps (example shown for
Directory.Read.All):- Click
"+ Add a permission"to open the slide-out panel for selecting permissions. - Select
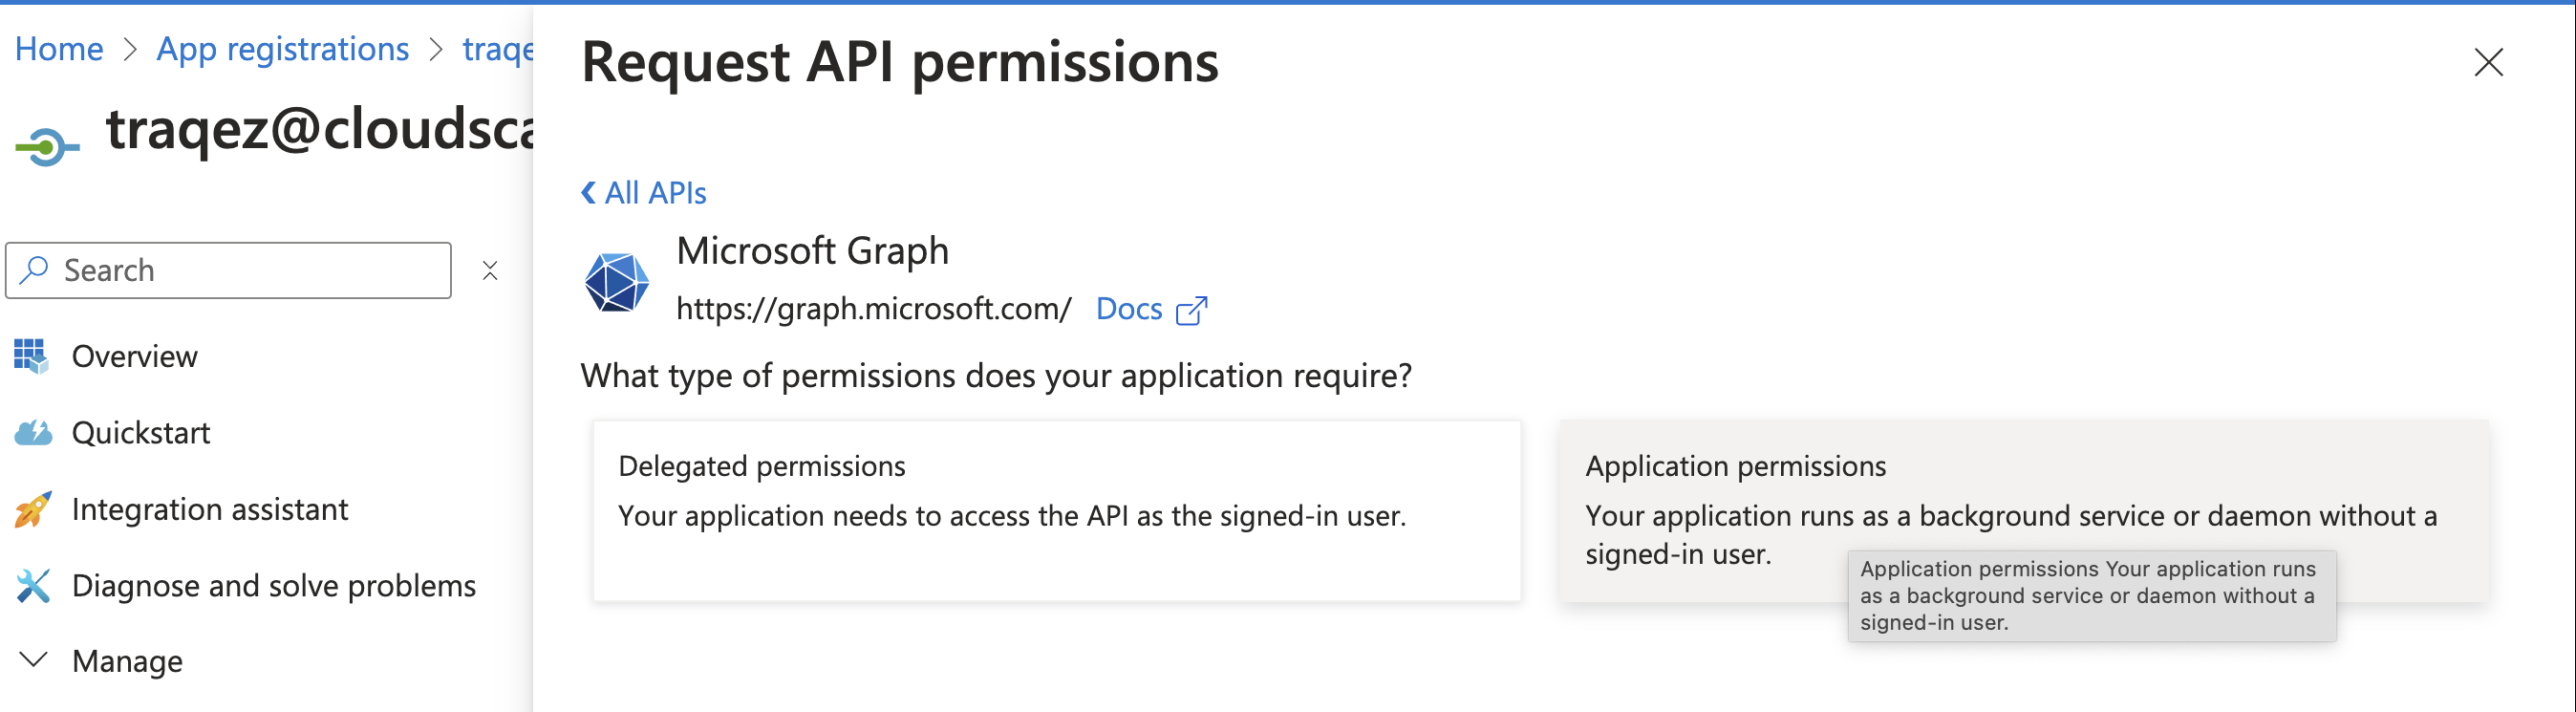
"Microsoft Graph"(Commonly used Microsoft API's). - Click
Application permissions - Enter
Directory.Read.Allin the search bar. - Expand the
Directory(1)option from the search results. - Select the checkbox:
Directory.Read.All. - Click
AddPermission.
- Click
To view a reference image of API permissions added for application, click here to expand.
After Add a permission button clicked, select microsoft graph.
Select Application permissions as shown below,
Search for the permission (Eg: Directory.Read.All) in search box and select it,

- Repeat above steps for
Policy.Read.AllandUserAuthenticationMethod.Read.All - Review the added permissions.
To view a reference image of selected API permissions, click here to expand.
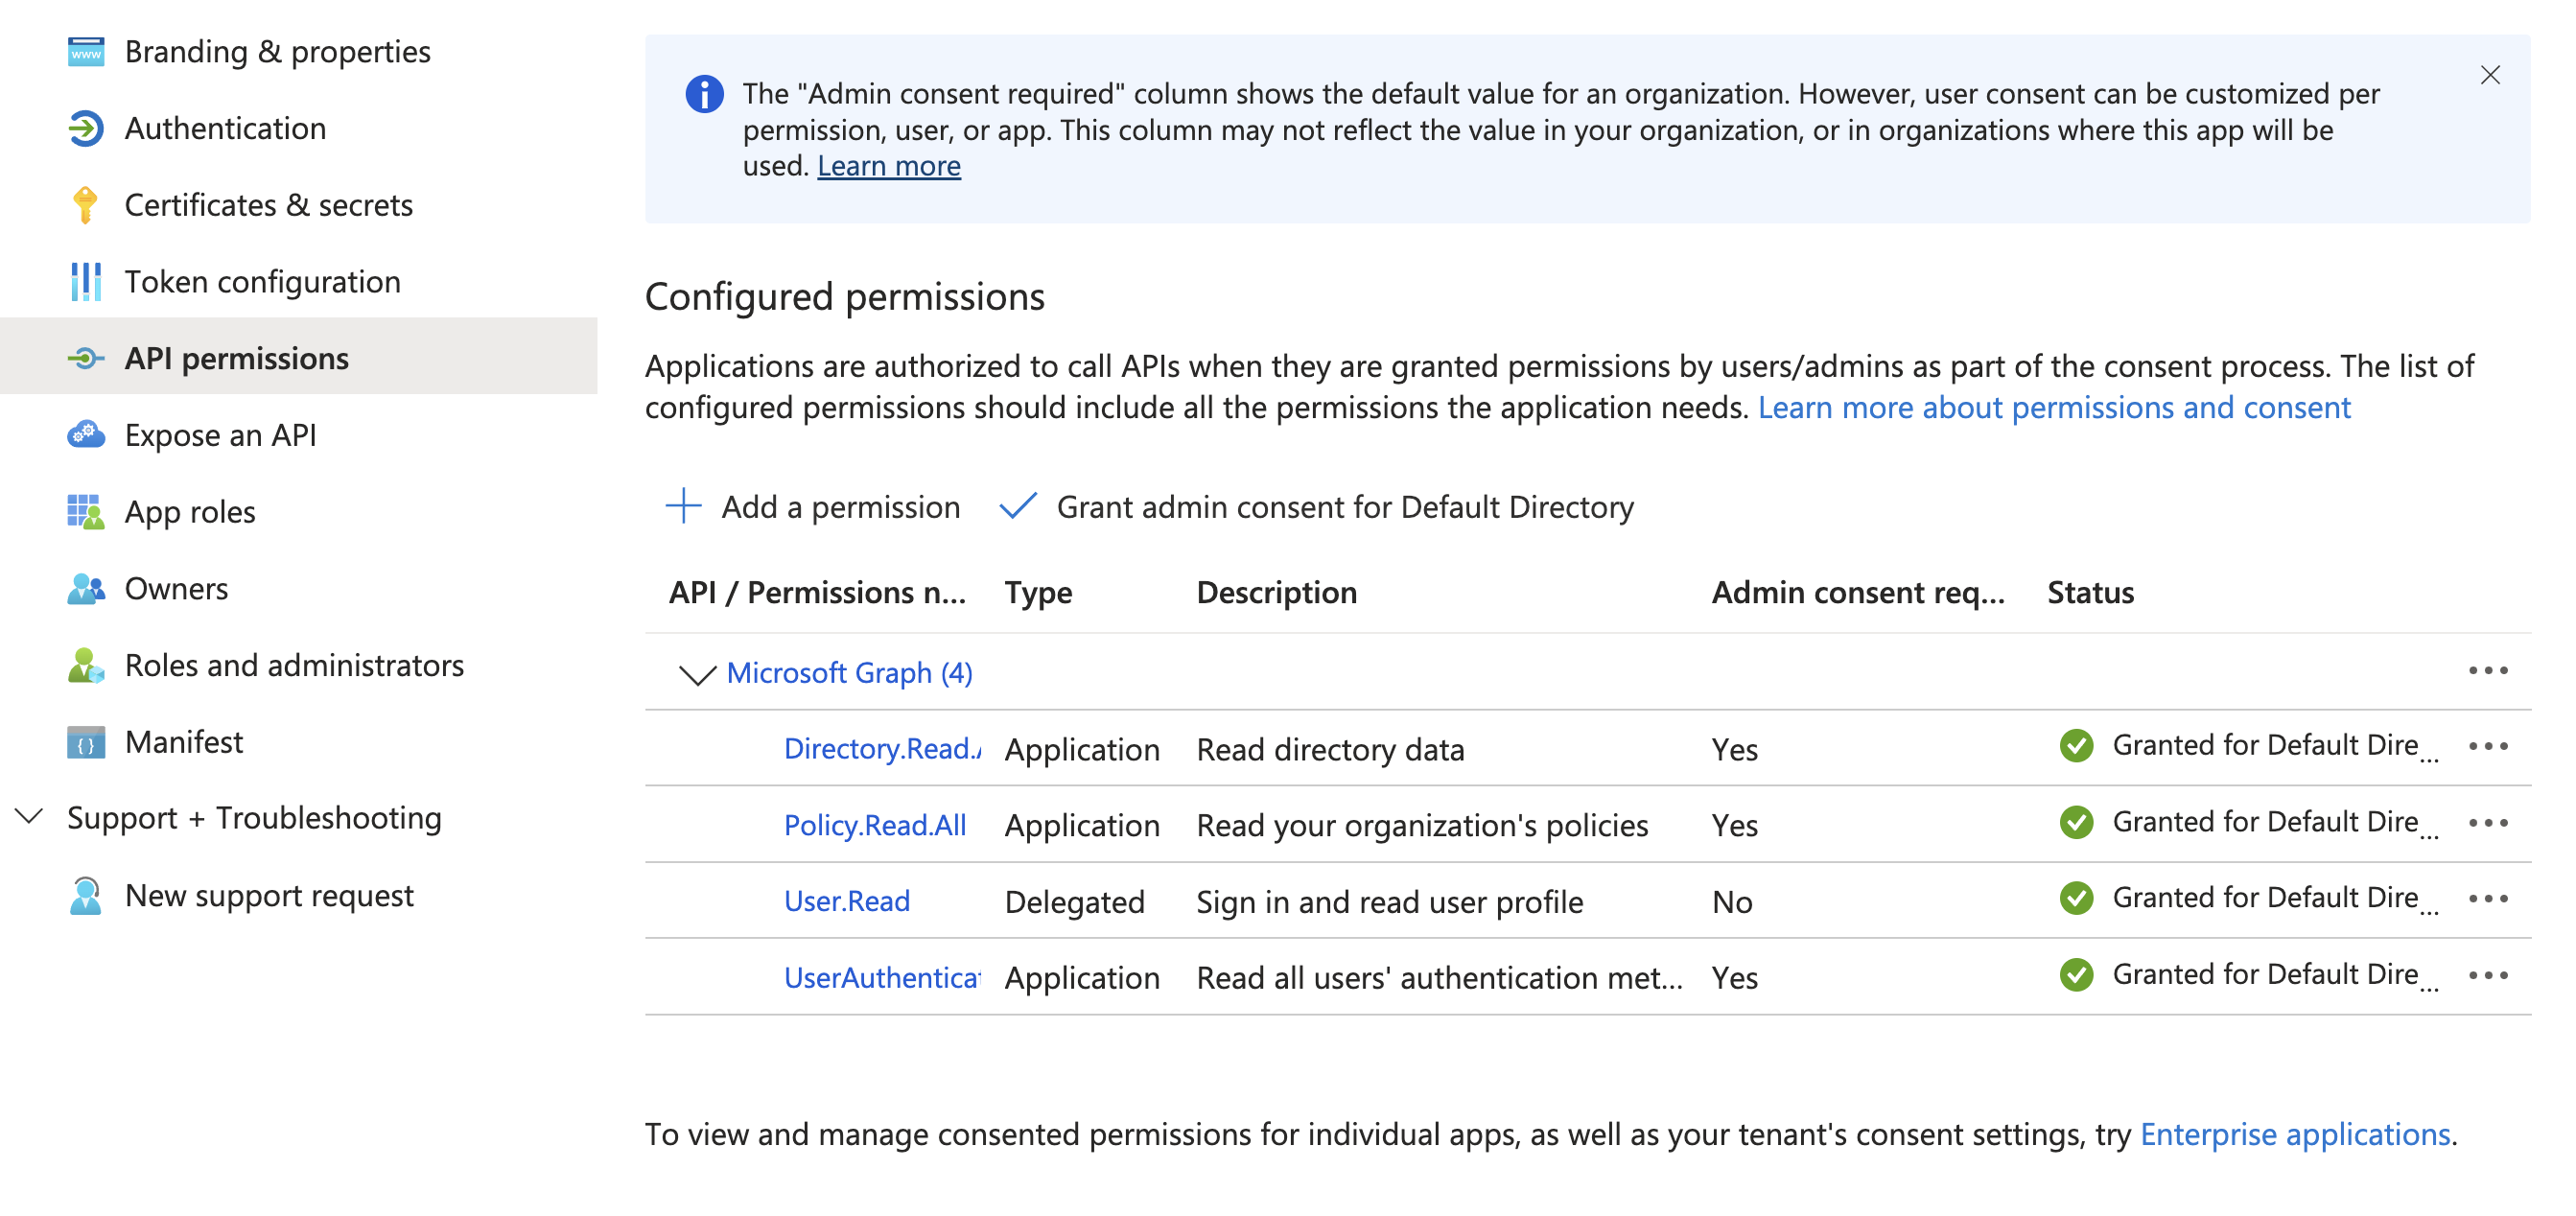
- Click
Grant admin consent for Default Directoryand verify the status changes toGranted for Default Directory.
To view a reference image of API permissions (and admin consent granted), click here to expand.
- Click
Certificates & secrets, then locate+ New client secret. Generate new secret and copy the secretValue. Eg:SJn8Q~532K~4uxv3lsW~IMSbjHV7U8eGhpNc~cPE.
To view a reference image of Certifacate & Secrets and generated secrent, click here to expand.

- Paste the copied secret value into the
Access client secrettextbox in the connectors dashboard within Cloud Security (CSPM). - Go to
Overviewsection and copy theApplication (client) IDandDirectory (tenant) ID.
To view a reference image of required information to be copied from app registration, click here to expand.
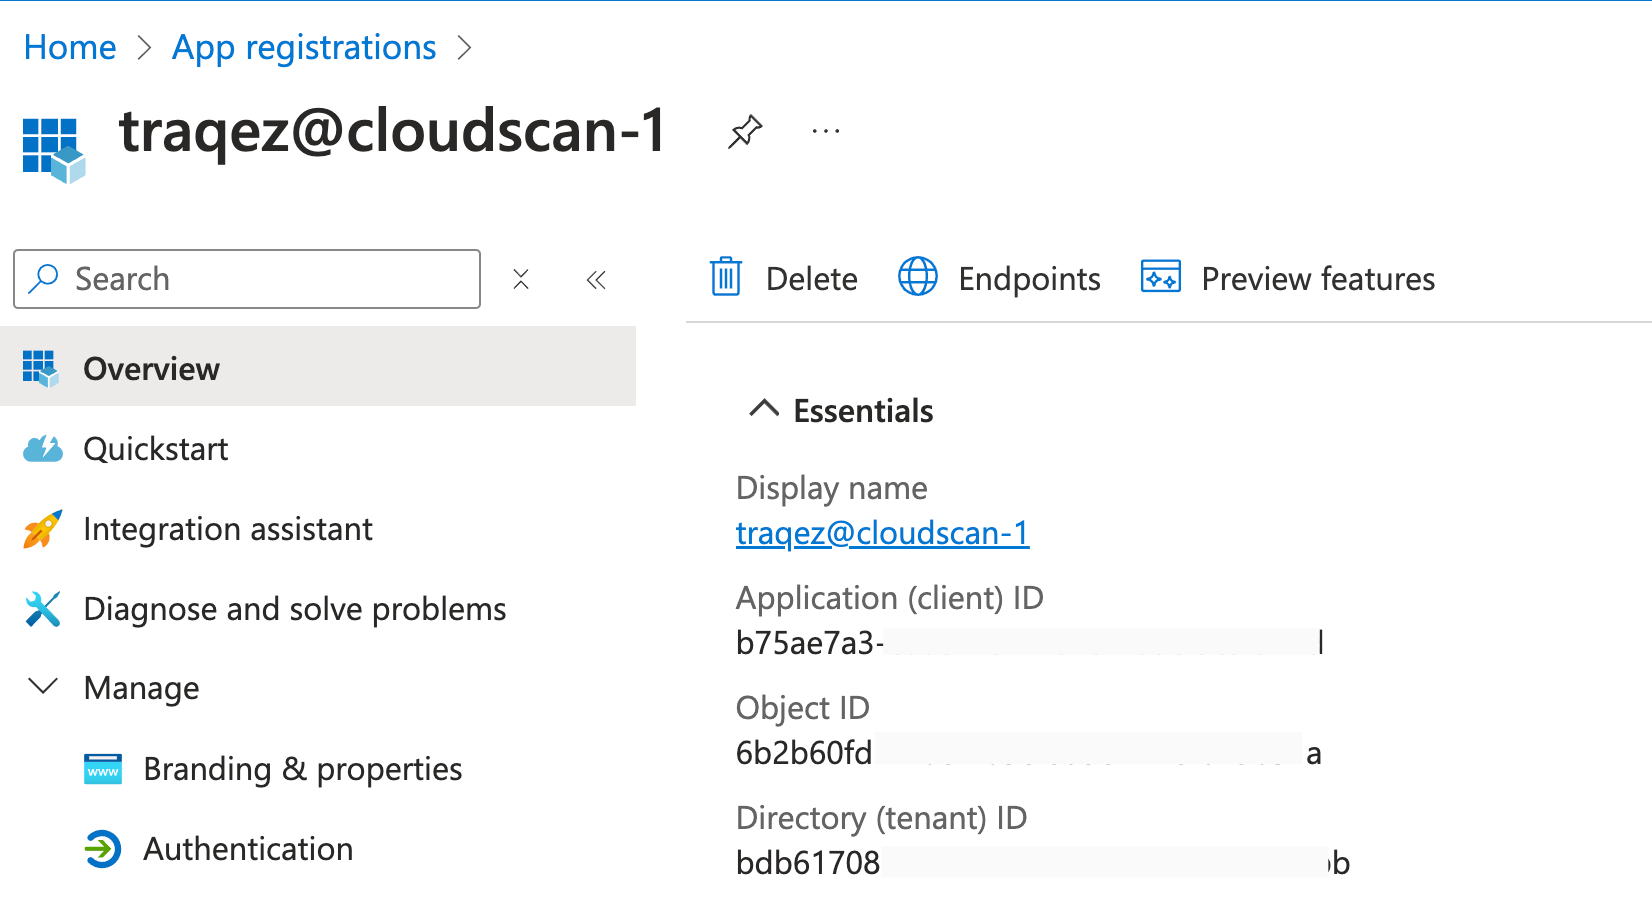
- Paste the copied
Application (client) IDinto theAccess client idtextbox in the connectors dashboard within Cloud Security (CSPM). - Paste the copied
Directory (tenant) IDinto theTenent idtextbox in the connectors dashboard within Cloud Security (CSPM).
Creating role for security checks and scanning
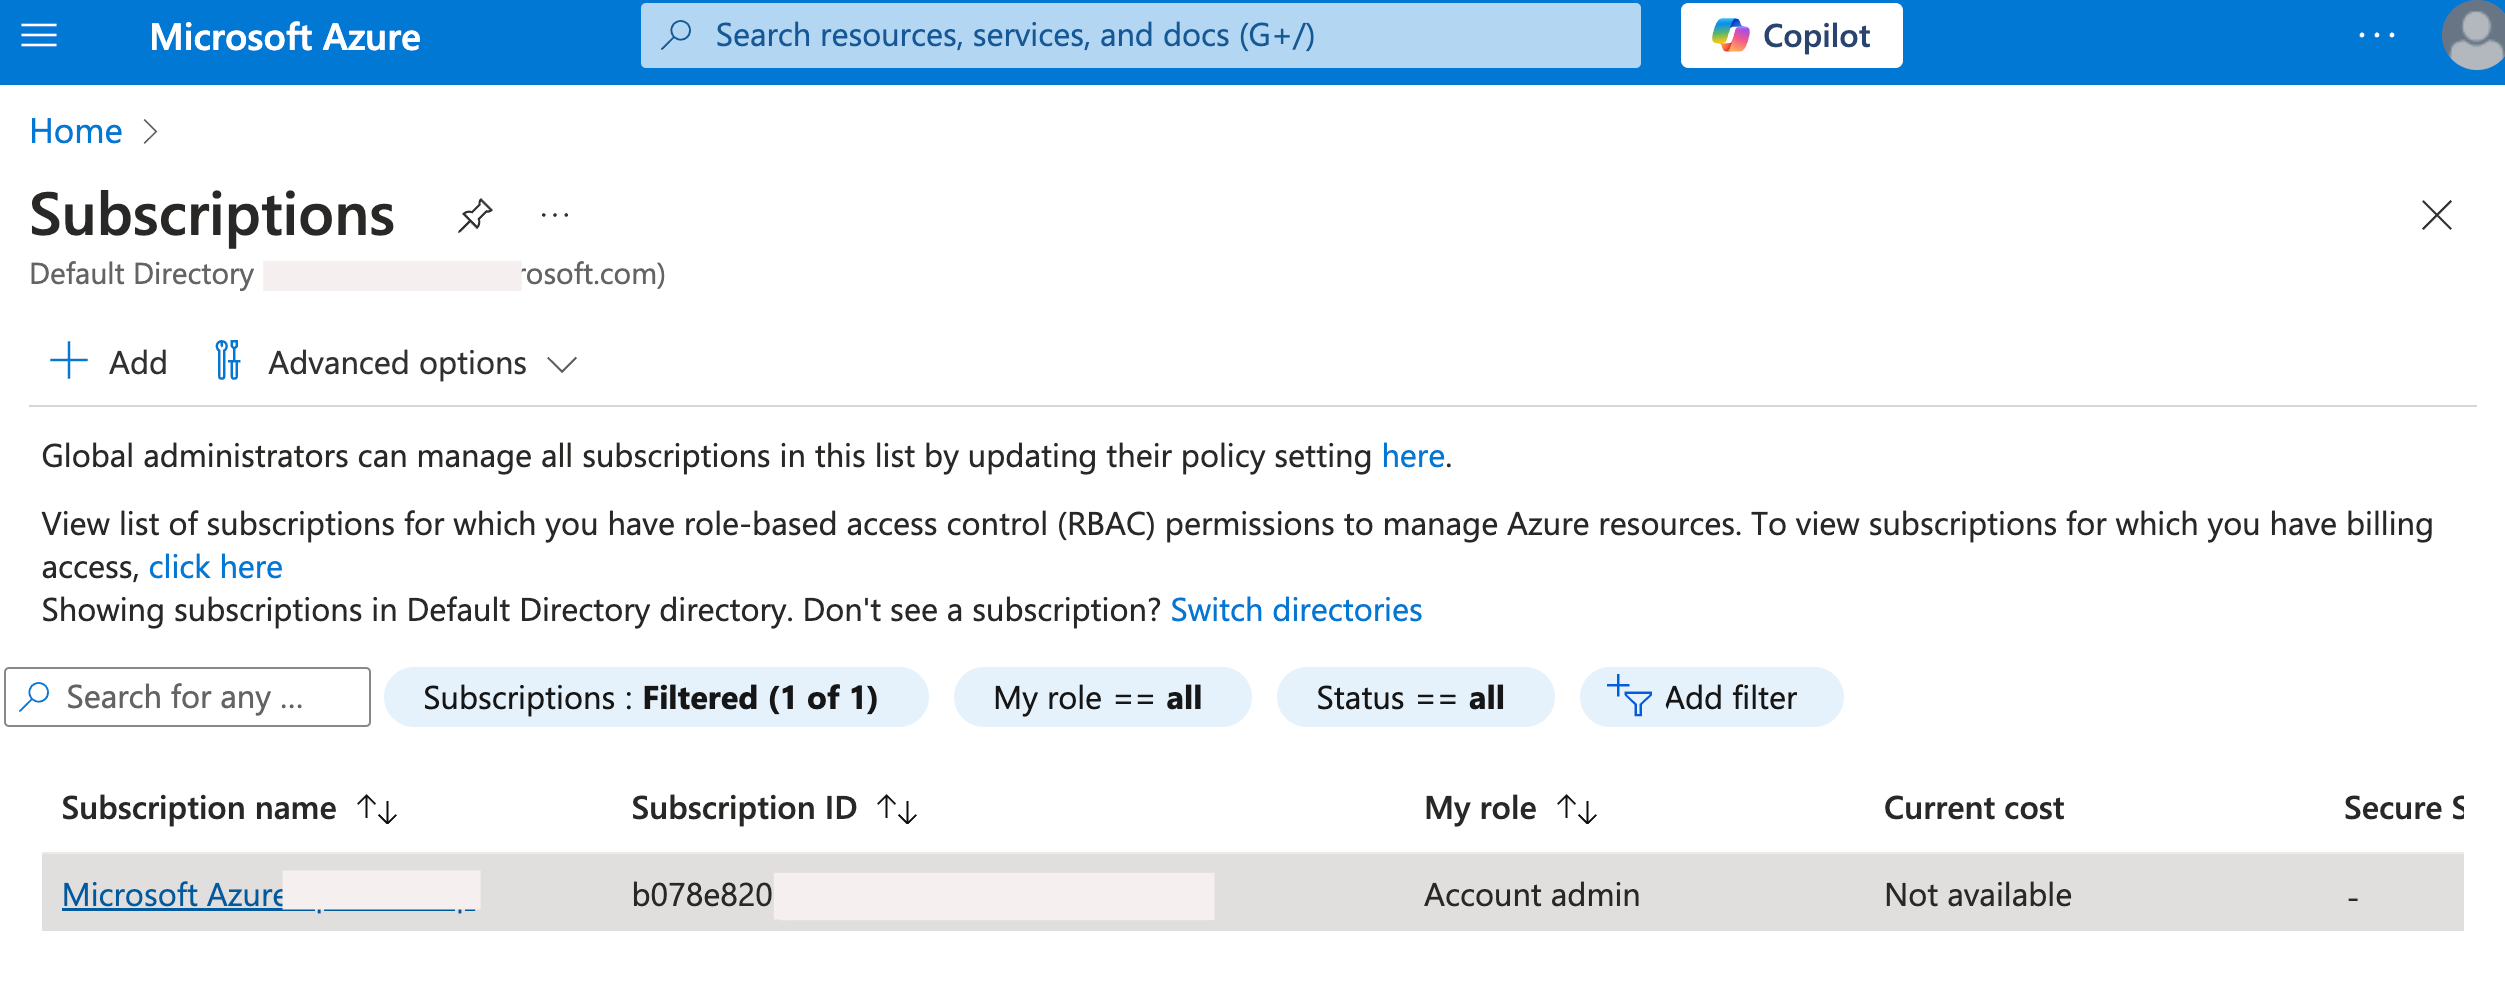
- Type
Subscriptionsin the search bar. SelectSubscriptionsfrom the search results menu.
To view a reference image of subscriptions, click here to expand.

- Navigate to
Subscriptionsand select the specific subscription you want to integrate with TraQez Security Scanner.
To view a reference image of list of subscriptions for integration, click here to expand.
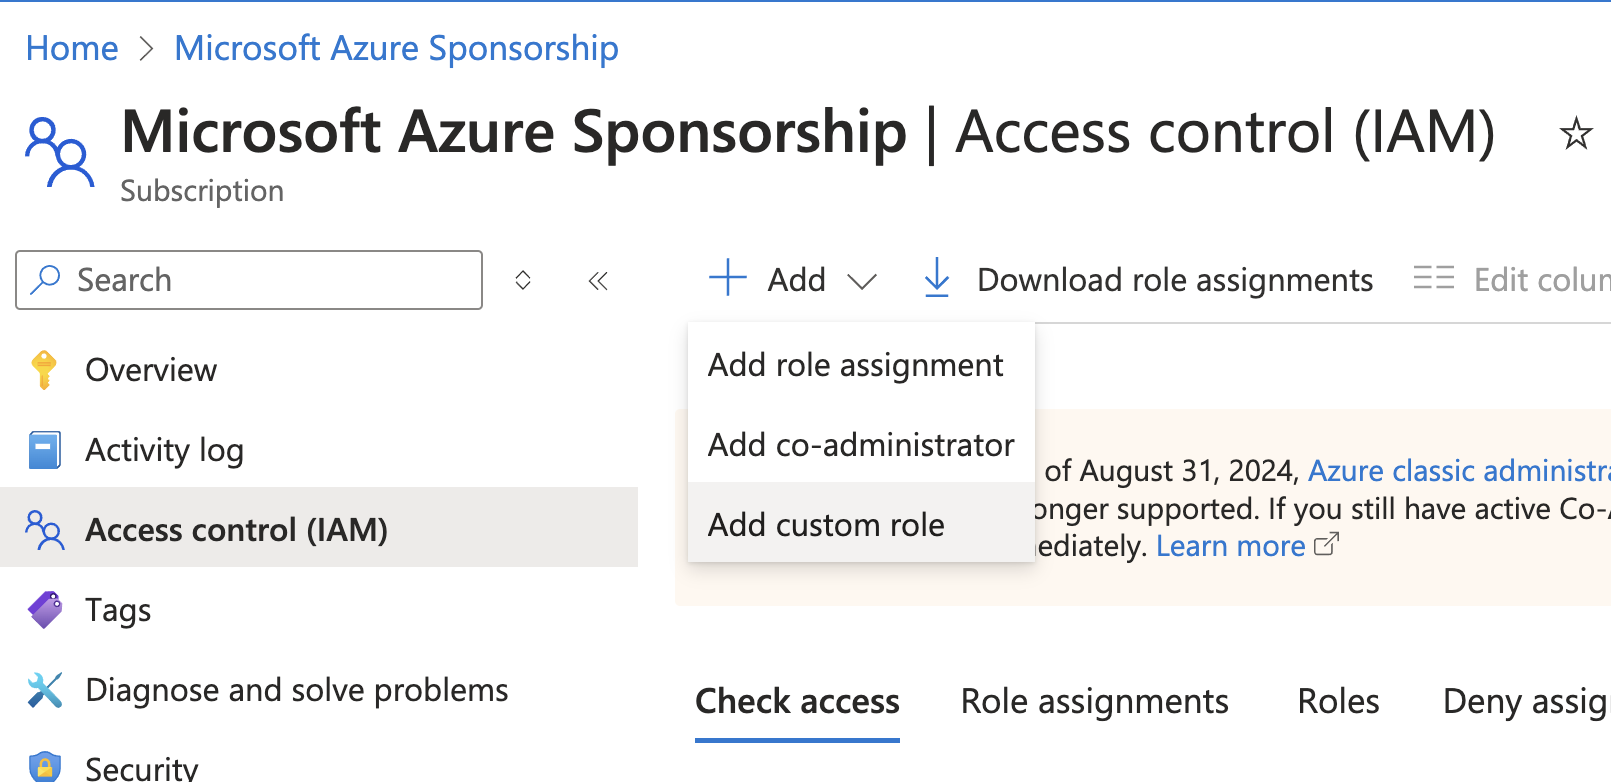
- Within the selected subscription's dashboard, locate the navigation bar on the left side and click on
Access Control (IAM). - Locate the
Addbutton at the top and click on it. From the dropdown menu that appears, selectAdd Custom Role.
To view a reference image of add custom role (and other options - Add role assignment. We will use Add Role assignment later), click here to expand.
- Give the Custom role name as
traqez@security-check-role-v1.0and optionally add description. - In the Baseline permissions choose
Start from scratchand clickNext - Click the
Add Permissionsto open a slide-out panel, which will display a list of permissions along with a search box. - In the search box, enter or paste the following permission:
Microsoft.Web/sites/host/listkeys/actionin the search box. (Copy the permission from below)
Microsoft.Web/sites/host/listkeys/action
- Select
Microsoft Web Appsfrom the search results, then check the box next toOther : List Web Apps Functions Host Keysand clickAdd.
To view a reference image of permissions to be added for the custom role, click here to expand.
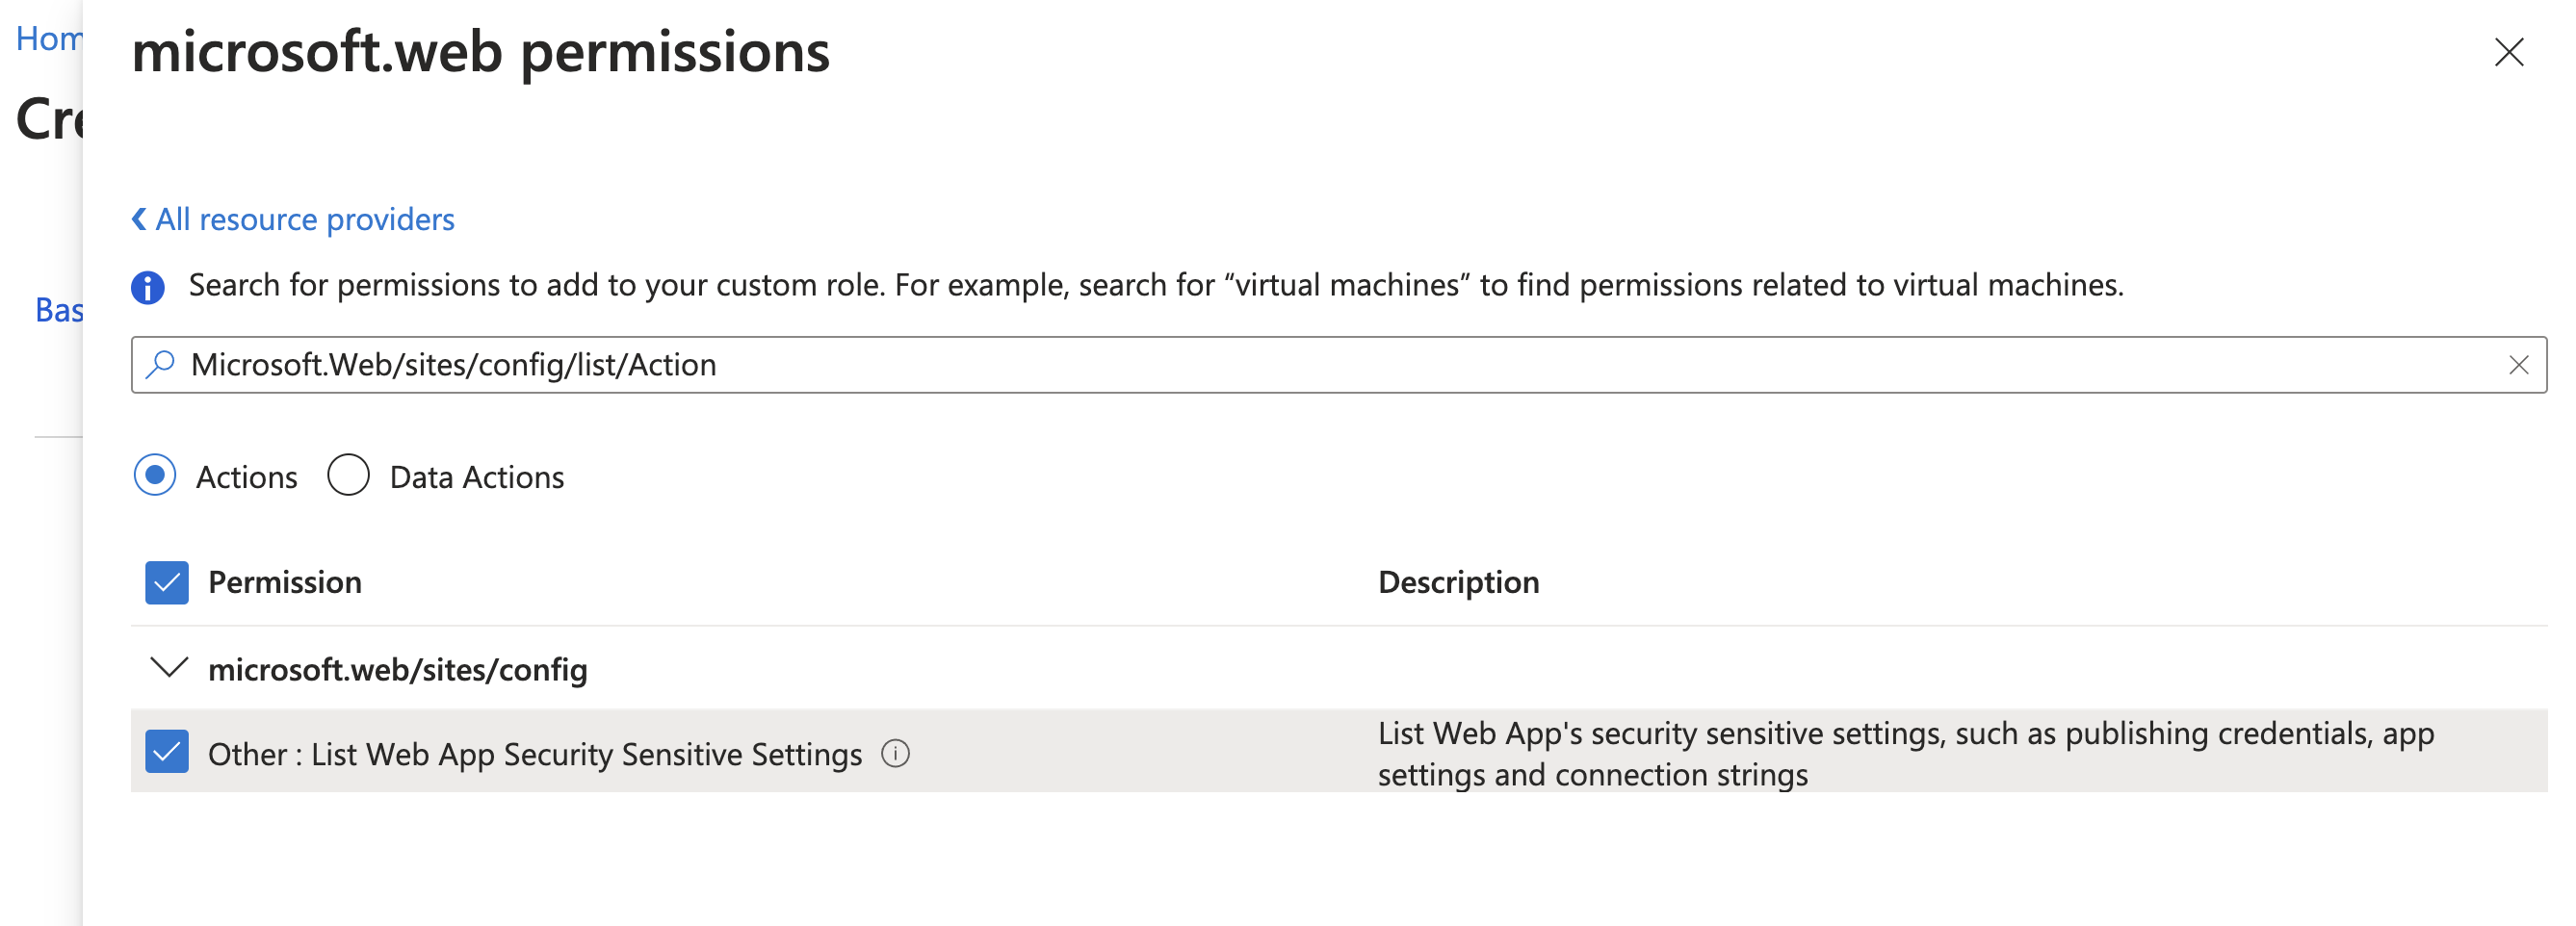
- Click the
Add Permissionsbutton again and search for the permissionMicrosoft.Web/sites/config/list/Action. (Copy the permission from below)
Microsoft.Web/sites/config/list/Action
- Select
Microsoft Web Appsagain, check the box next toOther : List Web App Security Sensitive Settingsand clickAdd. - Click
Nextto proceed to theAssignable Scope, where you should verify that the correct subscription ID is selected. Then, clickNextagain to access theJSONsection, which will display the corresponding JSON.
{
    "properties": {
        "roleName": "traqez@security-check-role-v1.0",
        "description": "",
        "assignableScopes": [
            "/subscriptions/XXXXXXXX-71f8-XXXX-afe6-XXXXXXXXXXXX"
        ],
        "permissions": [
            {
                "actions": [
                    "microsoft.web/sites/host/listkeys/action",
                    "Microsoft.Web/sites/config/list/Action"
                ],
                "notActions": [],
                "dataActions": [],
                "notDataActions": []
            }
        ]
    }
}
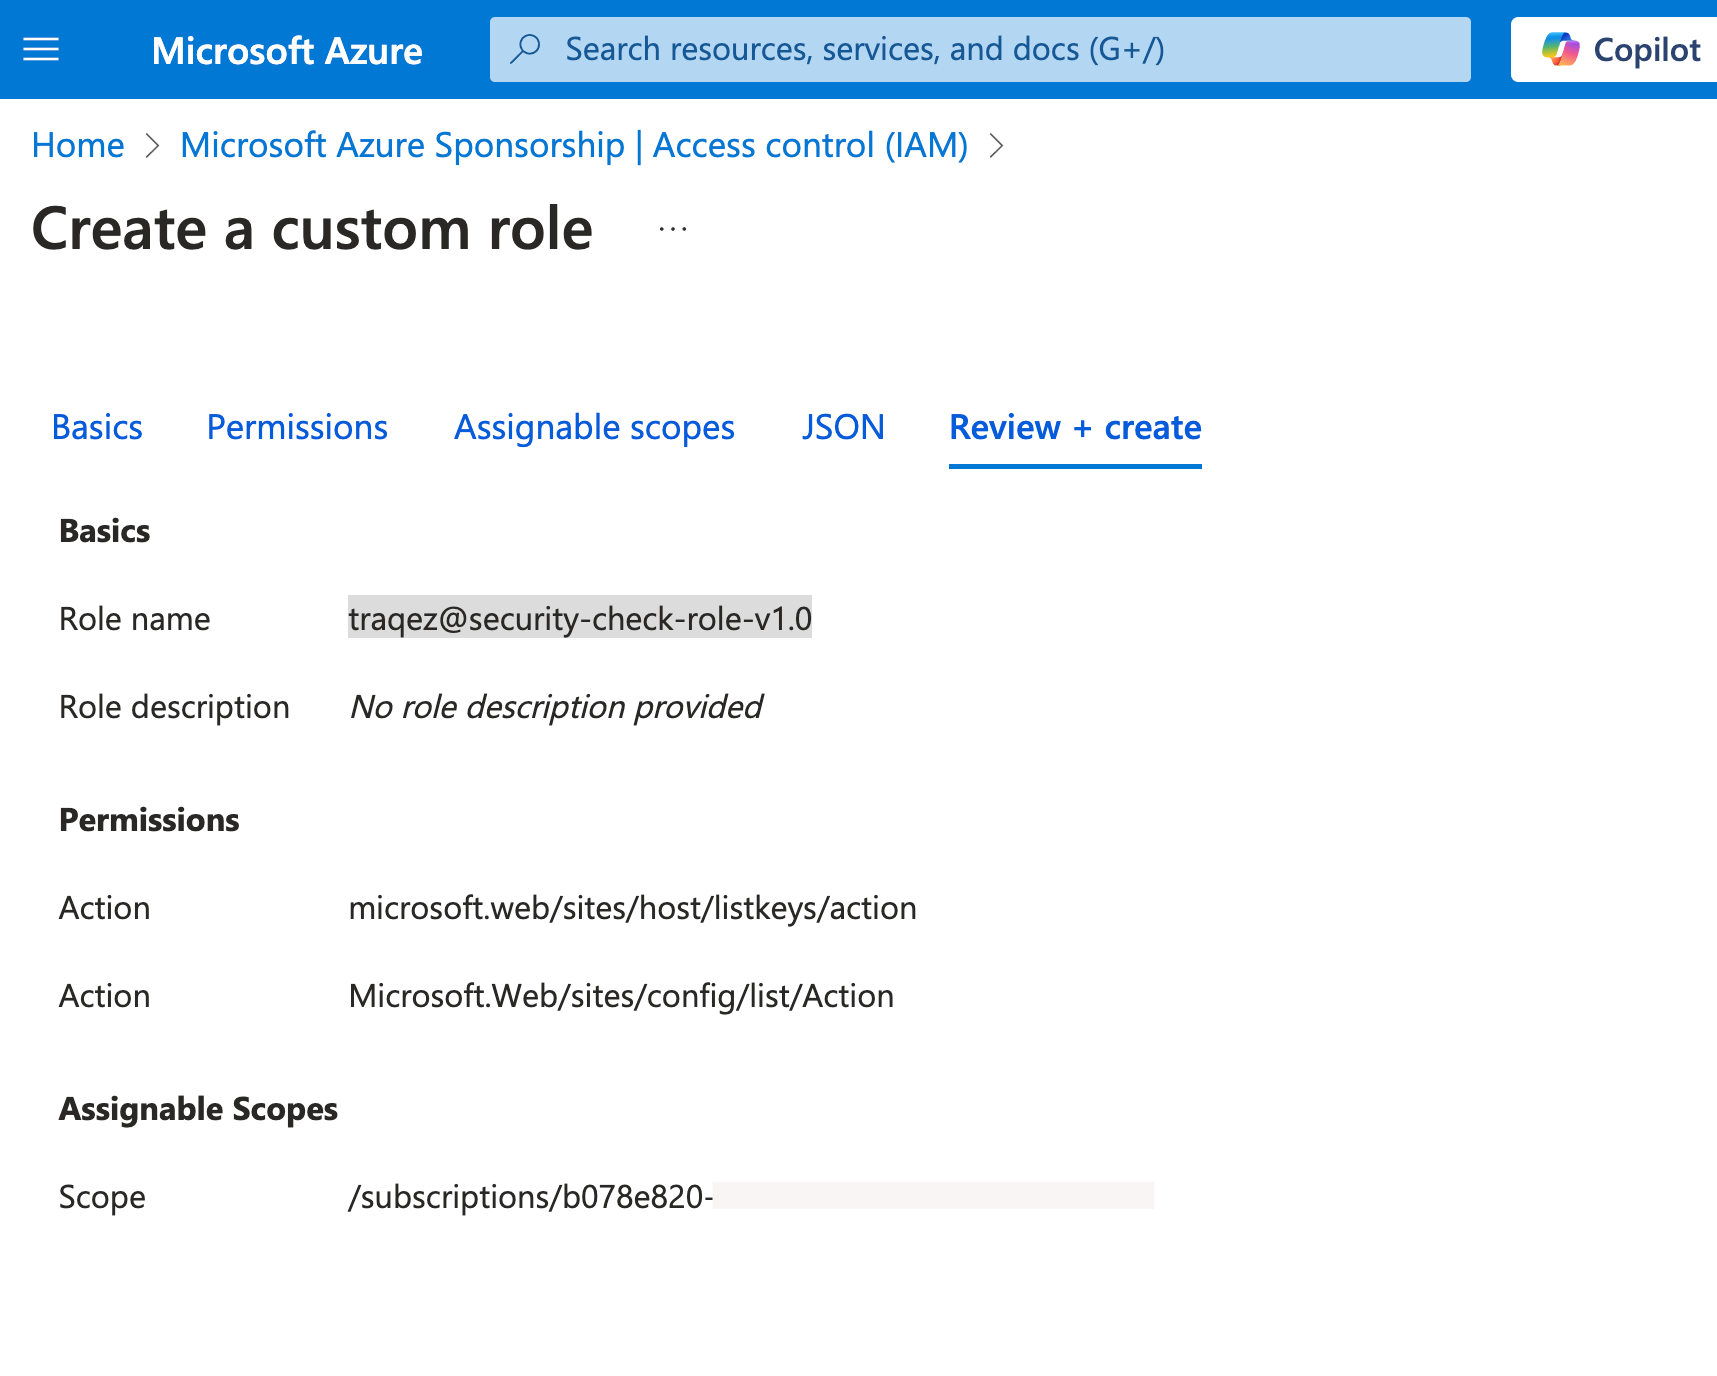
- Click the
Review + Createbutton to review your custom role settings. Verify that the selected permissions,microsoft.web/sites/host/listkeys/actionandMicrosoft.Web/sites/config/list/Action, and the role name,traqez@security-check-role-v1.0, are correct.
To view a reference image of reviewing of custom role, click here to expand.
- If all the details are accurate, click the
Createbutton to complete the custom role creation process.
Assign the required roles to the newly created application
- Navigate back to
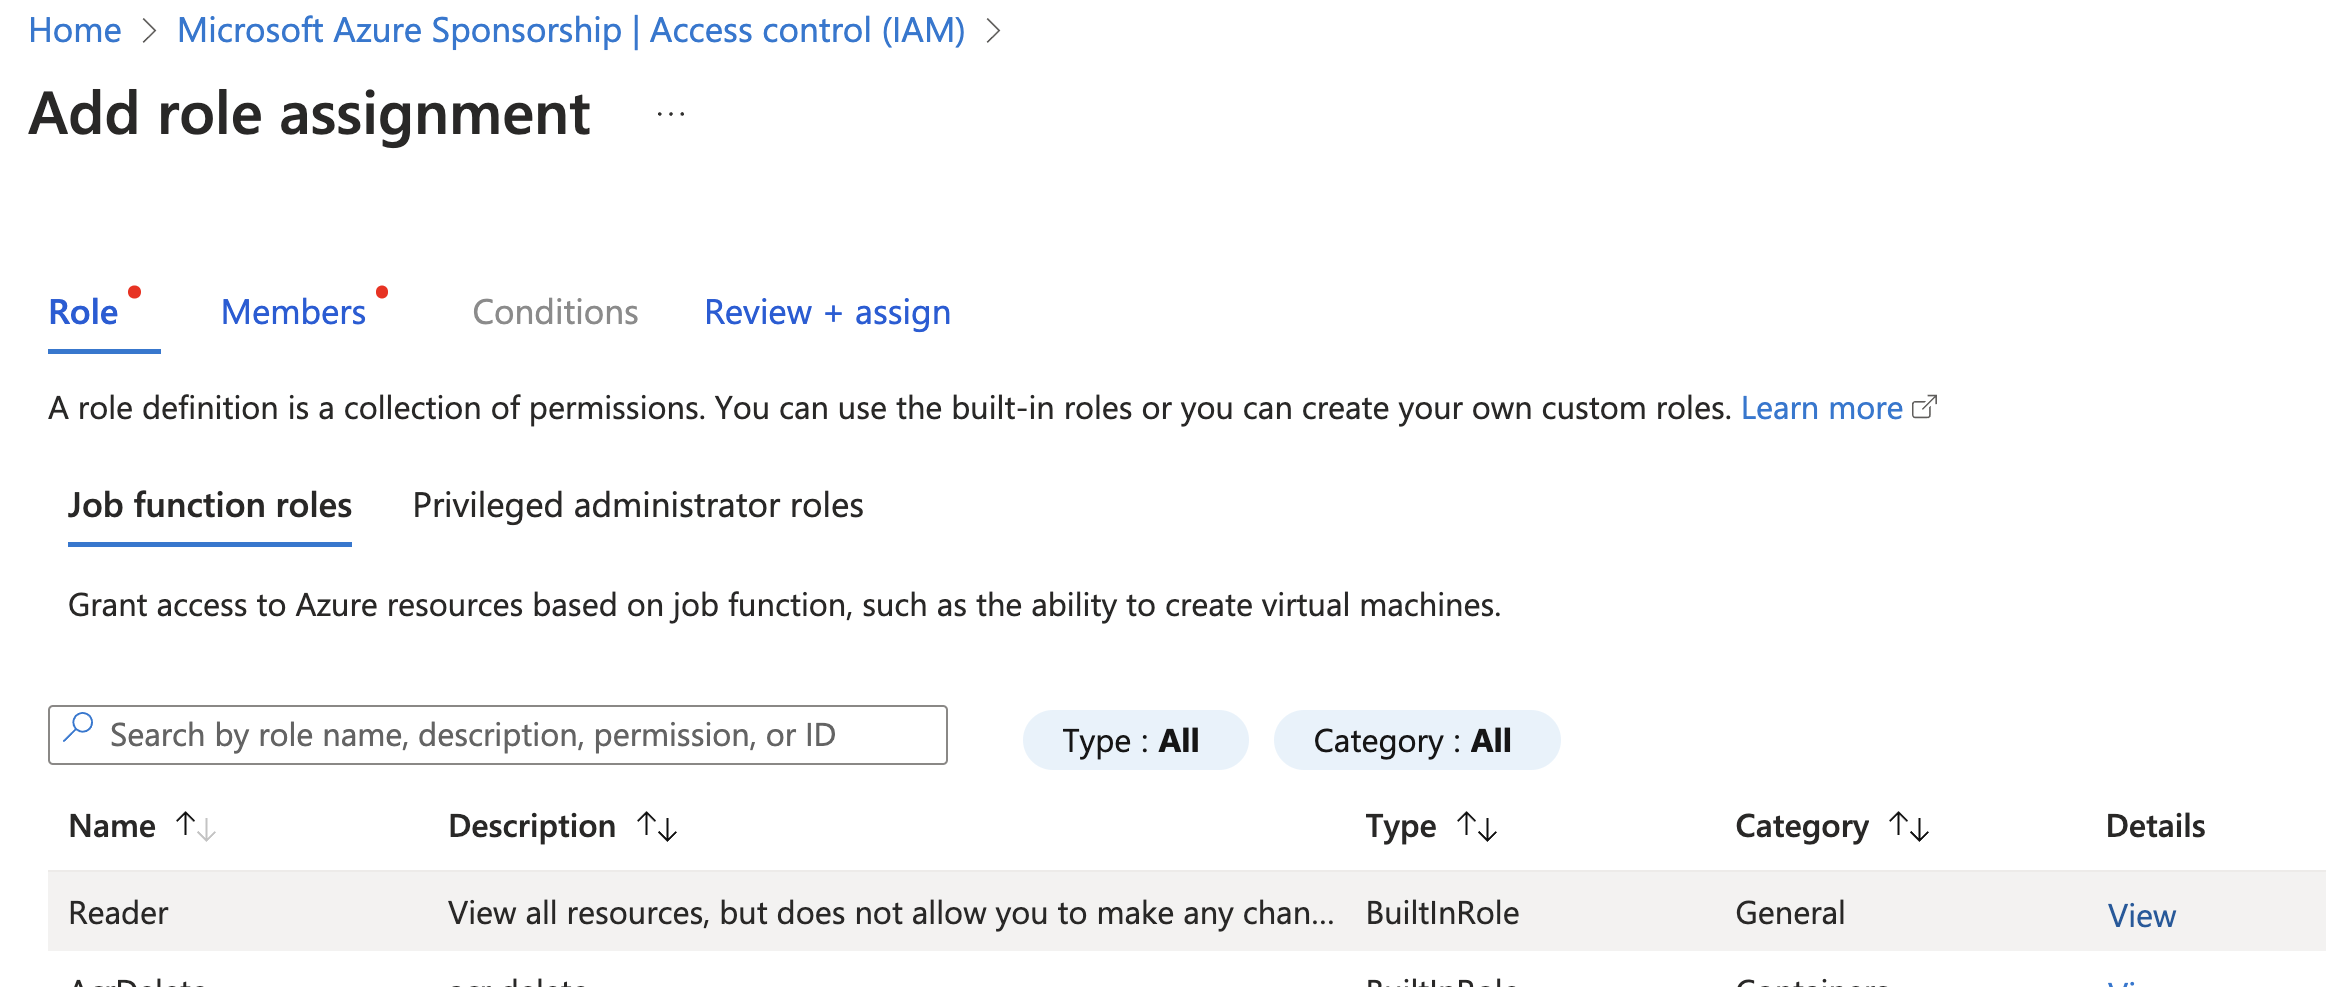
Subscriptionsand select your desired subscription. - Go to
Access control (IAM)and clickAdd, then selectAdd role assignmentfrom the dropdown. - Select
ReaderRole and clickNext.
To view a reference image of Reader Role, click here to expand.
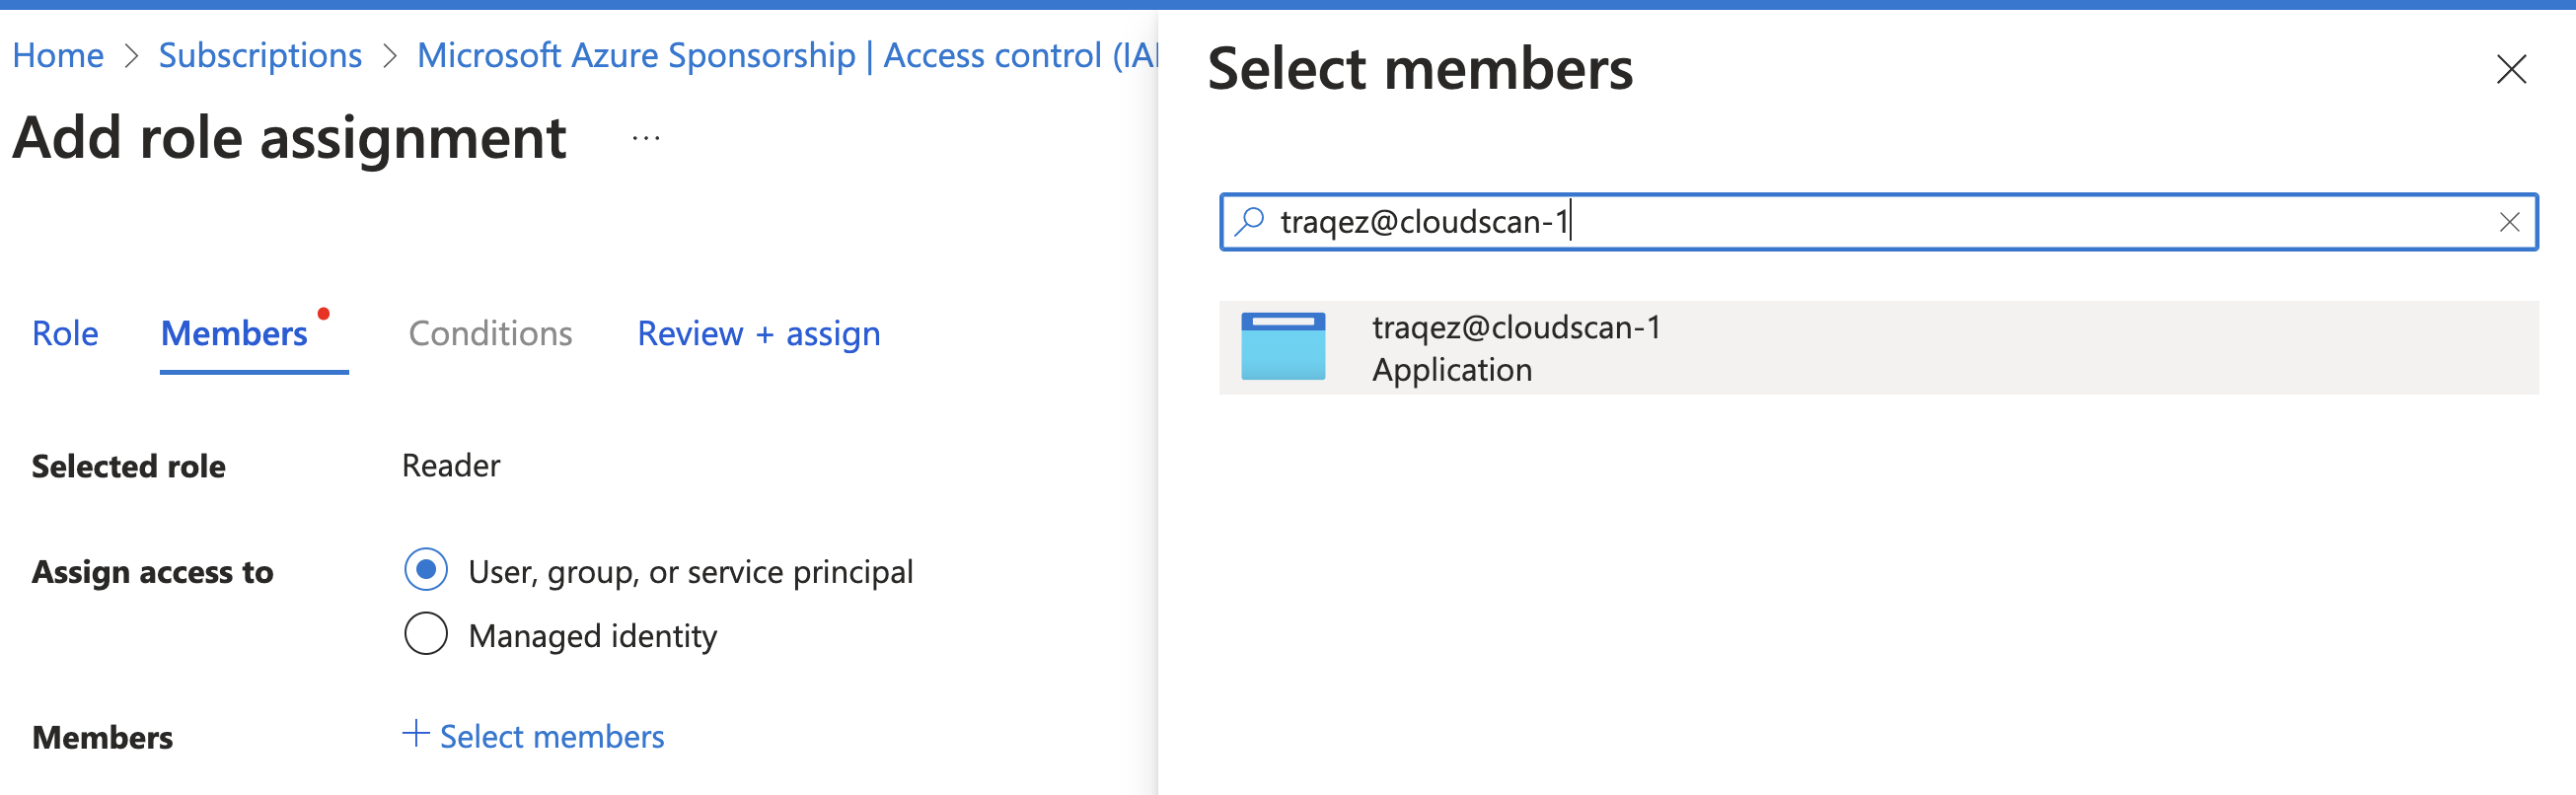
- Click
+ Select Members, search for the applicationtraqez@cloudscan-1created earlier, select it, and then clickReview + assign.
To view a reference image of member to be added for the role, click here to expand.
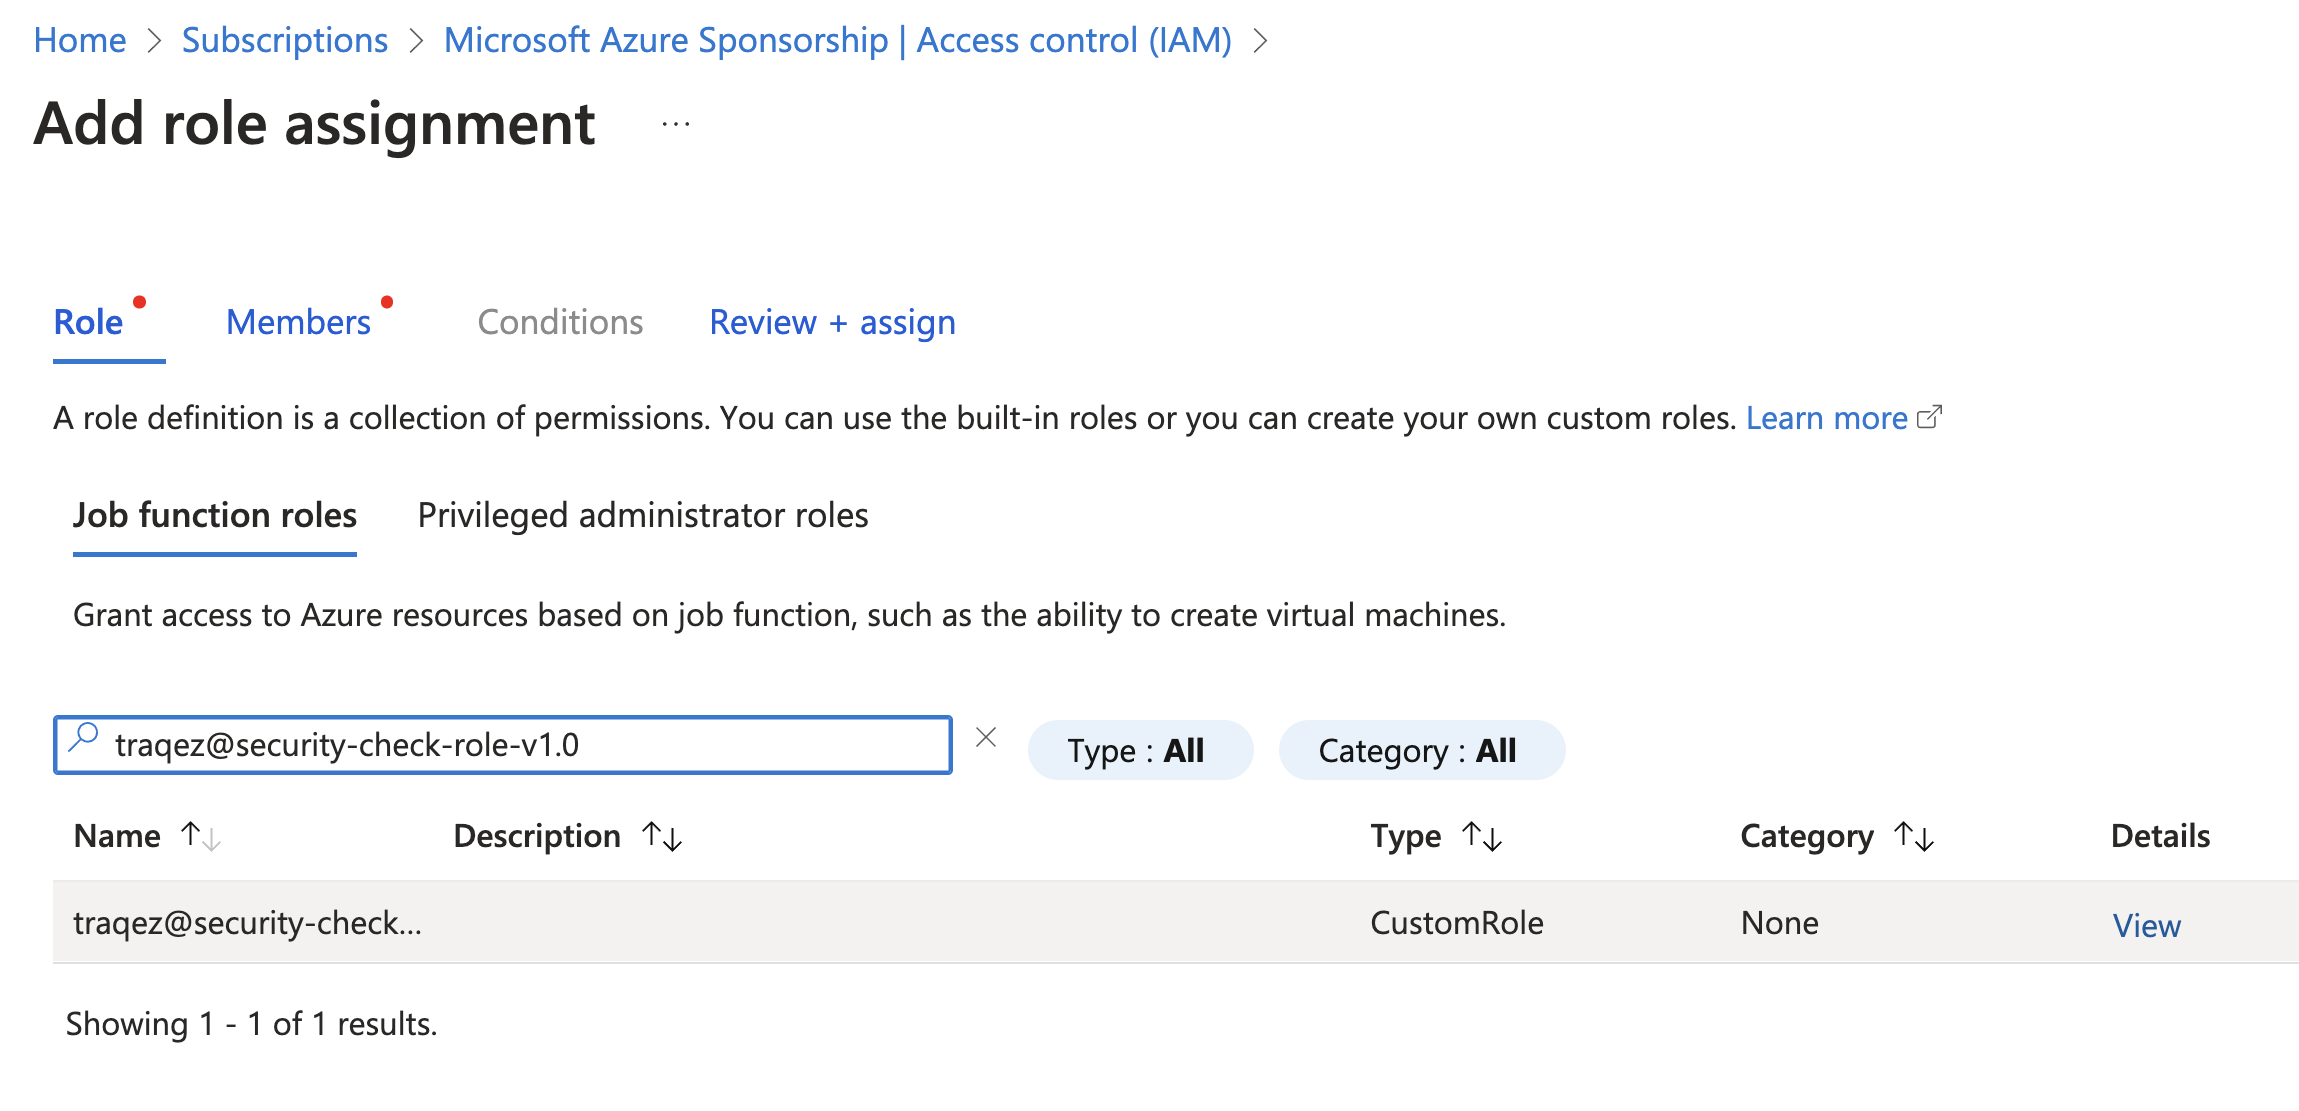
- Add the role:
traqez@security-check-role-v1.0which was created earlier. - Repeat the steps: Go to
Access control (IAM)and clickAdd, then selectAdd role assignment. Search for the roletraqez@security-check-role-v1.0. Click+ Select Members. Search for the applicationtraqez@cloudscan-1and select it as a member. ClickReview + assign.
To view a reference image of search for custom role, click here to expand.
- Navigate to the
Overviewsection and copy theSubscription ID.
To view a reference image of subscription Id to be copied, click here to expand.
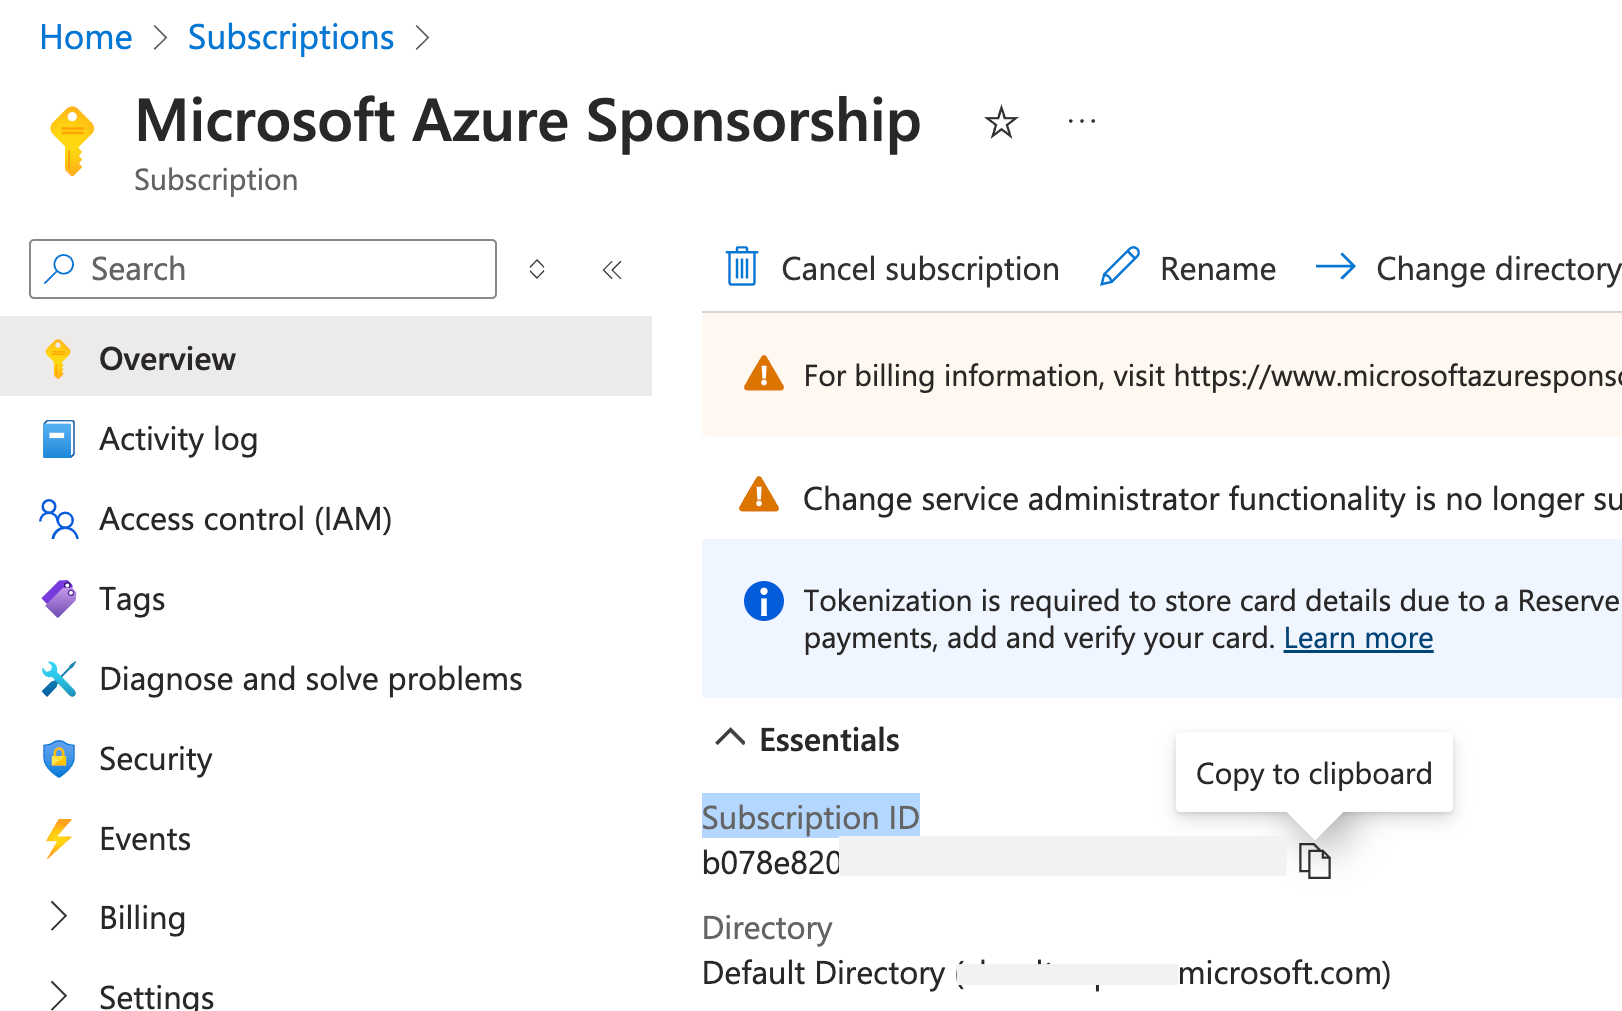
- Paste it into the
Subscription IDtextbox in the connectors dashboard within Cloud Security (CSPM).
Creating new Connector
Fill in the remaining connector details using the collected information: Subscription ID, Directory (tenant) ID, Application (client) ID and Secret Value.
- Select the cloud Provider:
Azurefrom the dropdown. - Enter the desired
Connector Name,DescriptionandTags. - Scan Settings: Configure the frequency of your scans and email report settings in this section. You can modify these settings at any time, even after the scan has been created.
- Configure periodic cloud security scanning by selecting the
Perform periodic scanning for new Connectoroption:- Daily: Scan assets daily at a specified time.
- Weekly: Scan assets weekly on a chosen day (e.g., Friday, Saturday) at a specified time.
- Bi-Weekly: Scan assets every other week on a chosen day at a specified time.
- Monthly: Scan assets monthly on a chosen day within the first week of the month at a specified time.
- Schedule a one-time scan for a future date and time by selecting the
Schedule Scan at given time and run only once.option. The scan will execute at the specified time based on your configured user timezone.
Note: When enabling periodic/continuous scanning, the configured scan time will be executed in UTC Timezone. For example, if you schedule a scan for 4:00 am, it will run at 4:00 am UTC, not 4:00 in your local timezone.
- Scan Options: Customize the behavior of the vulnerability scanner and refine your results using the following options:
- Save all scan artifacts for later reference. Select this option to store all scan-related data, including logs and evidence, for future reference. This will retain raw data generated during the scan.
- Save vulnerabilities with information/log level. Log information level messages from the vulnerability scanner which includes enumeration information, service information etc. Also useful for asset discovery and mapping.
- Scan for all supported services across your cloud environment. Enable this checkbox to scan all supported services within Azure (around 16 services are supported.) or customise what services need to be scanned by selecting the dropdown
Select custom services for cloud environment.
- Fill in the
Scan Credentialssection with the collected information:- Subscription ID
- Directory (tenant) ID
- Application (client) ID
- Secret Value
To view a reference image of scan credentials used, click here to expand.
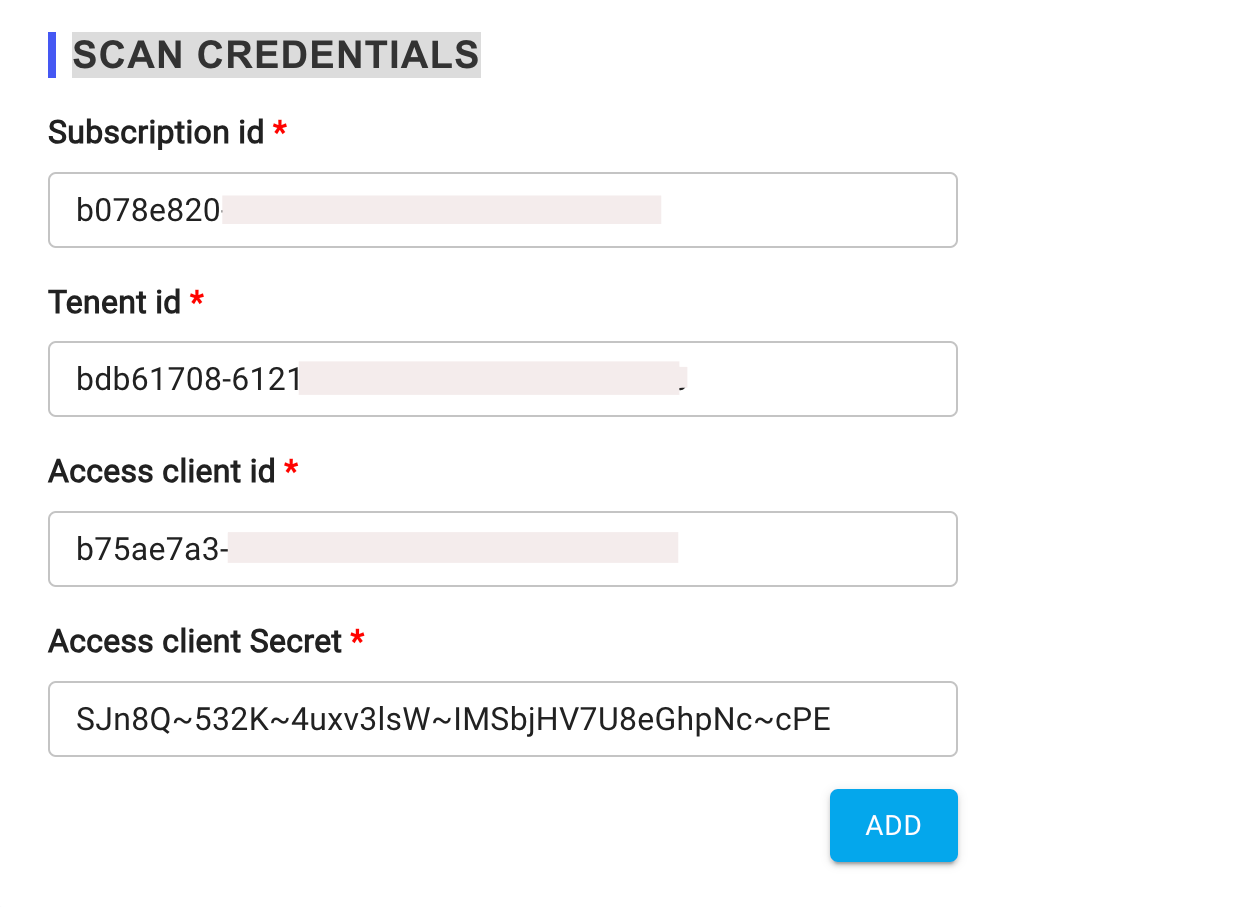
- Complete the scan credentials configuration.
Supported Azure services for Scan
- defender
- app
- entra
- monitor
- sqlserver
- storage
- network
- keyvault
- postgresql
- vm
- mysql
- aks
- cosmosdb
- iam
- policy
- appinsights